Build Your LEGO Pikachu Like A Pro: The Ultimate Guide
Ever wondered how to bring that adorable LEGO Pikachu to life? Well, buckle up because we’re diving deep into the world of LEGO Pikachu instructions! Whether you’re a seasoned LEGO enthusiast or a total noob, this guide has got your back. With step-by-step tips, tricks, and insider secrets, you’ll be assembling Pikachu faster than you can say "Pika Pika!"
Let’s face it—LEGO Pikachu isn’t just another toy. It’s an iconic masterpiece that combines nostalgia, creativity, and sheer awesomeness. But let’s be real here, the instructions can sometimes feel like they’re written in hieroglyphics. Fear not, my friend! This guide will decode those mysterious symbols and ensure you nail every step without breaking a sweat.
Now, before we jump into the nitty-gritty of LEGO Pikachu instructions, let’s talk about why this little yellow guy is such a big deal. From its origins in the Pokémon universe to becoming a LEGO superstar, Pikachu has captured hearts worldwide. So, grab your favorite drink, sit back, and let’s embark on this electrifying LEGO adventure!
Read also:Bolly4u Skymovieshd Your Ultimate Guide To Streaming Bollywood Movies
Table of Contents
- LEGO Pikachu: A Brief Biography
- Tools You’ll Need for Success
- Step 1: Unboxing the Joy
- Step 2: Sorting Your Pieces
- Step 3: Deciphering the Instructions
- Step 4: Assembling Pikachu’s Body
- Step 5: Adding Pikachu’s Signature Features
- Pro Tips for Building LEGO Pikachu
- Common Issues and How to Fix Them
- Troubleshooting Your LEGO Build
LEGO Pikachu: A Brief Biography
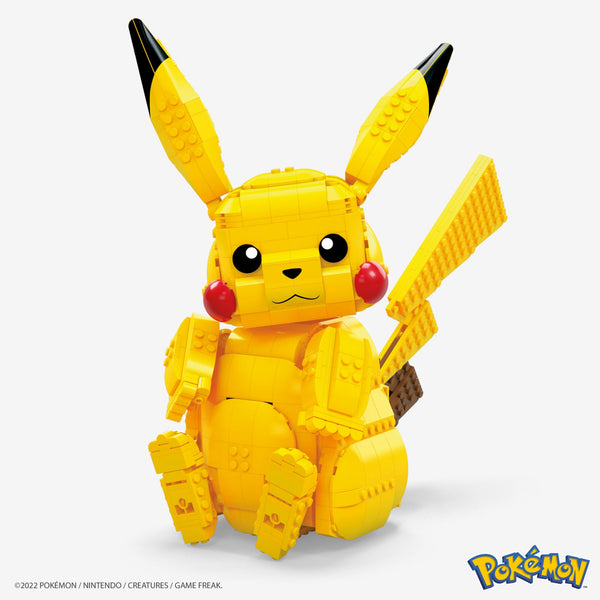
Before we dive into the instructions, let’s take a moment to appreciate the star of the show. LEGO Pikachu first burst onto the scene in 2017 as part of the LEGO Pokémon collaboration. Designed to celebrate the 20th anniversary of Pokémon, this limited-edition set quickly became a fan favorite. With over 260 pieces, it’s the perfect blend of challenge and charm.
But what makes LEGO Pikachu so special? For starters, it’s a faithful recreation of Pikachu’s iconic design. From the lightning bolt tail to those adorable red cheeks, every detail is spot-on. Plus, the set includes a Poké Ball, making it the ultimate collector’s item for both LEGO and Pokémon fans.
Check out this quick breakdown of LEGO Pikachu’s stats:
| Set Number | 21144 |
|---|---|
| Piece Count | 269 pieces |
| Release Date | 2017 |
| Theme | LEGO Pokémon Collaboration |
| Dimensions | 4.5” (H) x 4.5” (W) x 3” (D) |
Tools You’ll Need for Success
Building LEGO Pikachu is all about preparation. Sure, you could just dive in, but having the right tools can make the process smoother and more enjoyable. Here’s a quick list of essentials:
- A flat workspace: A clean, clutter-free area will help you stay organized.
- A tray or sorting mat: Keeps your pieces from scattering everywhere.
- A LEGO removal tool: Handy for those pesky stuck pieces.
- A magnifying glass: For those tiny details you might miss.
- A cup of patience: Building LEGO takes time, so don’t rush it!
Trust me, these small investments will save you a lot of frustration down the line.
Step 1: Unboxing the Joy
Alright, let’s get started! The first step in any LEGO build is unboxing, and trust me, it’s half the fun. As you open the box, take a moment to admire the pieces inside. It’s like unwrapping a present, except this one requires assembly. Make sure you’ve got all the bags, instructions, and extra parts before you begin.
Read also:Vegamovie 20 The Ultimate Streaming Experience You Need Right Now
Pro tip: Double-check the box for any loose pieces that might be hiding in the corners. Nothing’s worse than realizing halfway through that you’re missing a crucial piece.
Step 2: Sorting Your Pieces
Sorting your LEGO pieces might seem tedious, but it’s worth it. By organizing your pieces by color or size, you’ll save time and reduce stress during the build. Plus, it’s just satisfying to see everything laid out in neat little piles.
Here’s a quick method for sorting:
- Color coding: Group pieces by color for easy identification.
- Size sorting: Separate small pieces from larger ones to avoid confusion.
- Bag organization: Keep each numbered bag in order to follow the instructions seamlessly.
Remember, the key to a successful build is staying organized. Trust me, your future self will thank you.
Step 3: Deciphering the Instructions
Now, let’s talk about the elephant in the room: the instructions. LEGO Pikachu instructions can be a bit overwhelming at first glance, but don’t panic. The key is to take it one step at a time. Start by familiarizing yourself with the symbols and abbreviations used in the guide.
Here’s a quick breakdown of what you’ll encounter:
- Arrows: Point to the exact spot where a piece should go.
- Numbers: Indicate the order of assembly.
- Colors: Match the colors of the pieces for clarity.
Remember, if something doesn’t make sense, take a break and come back to it later. Sometimes a fresh perspective is all you need.
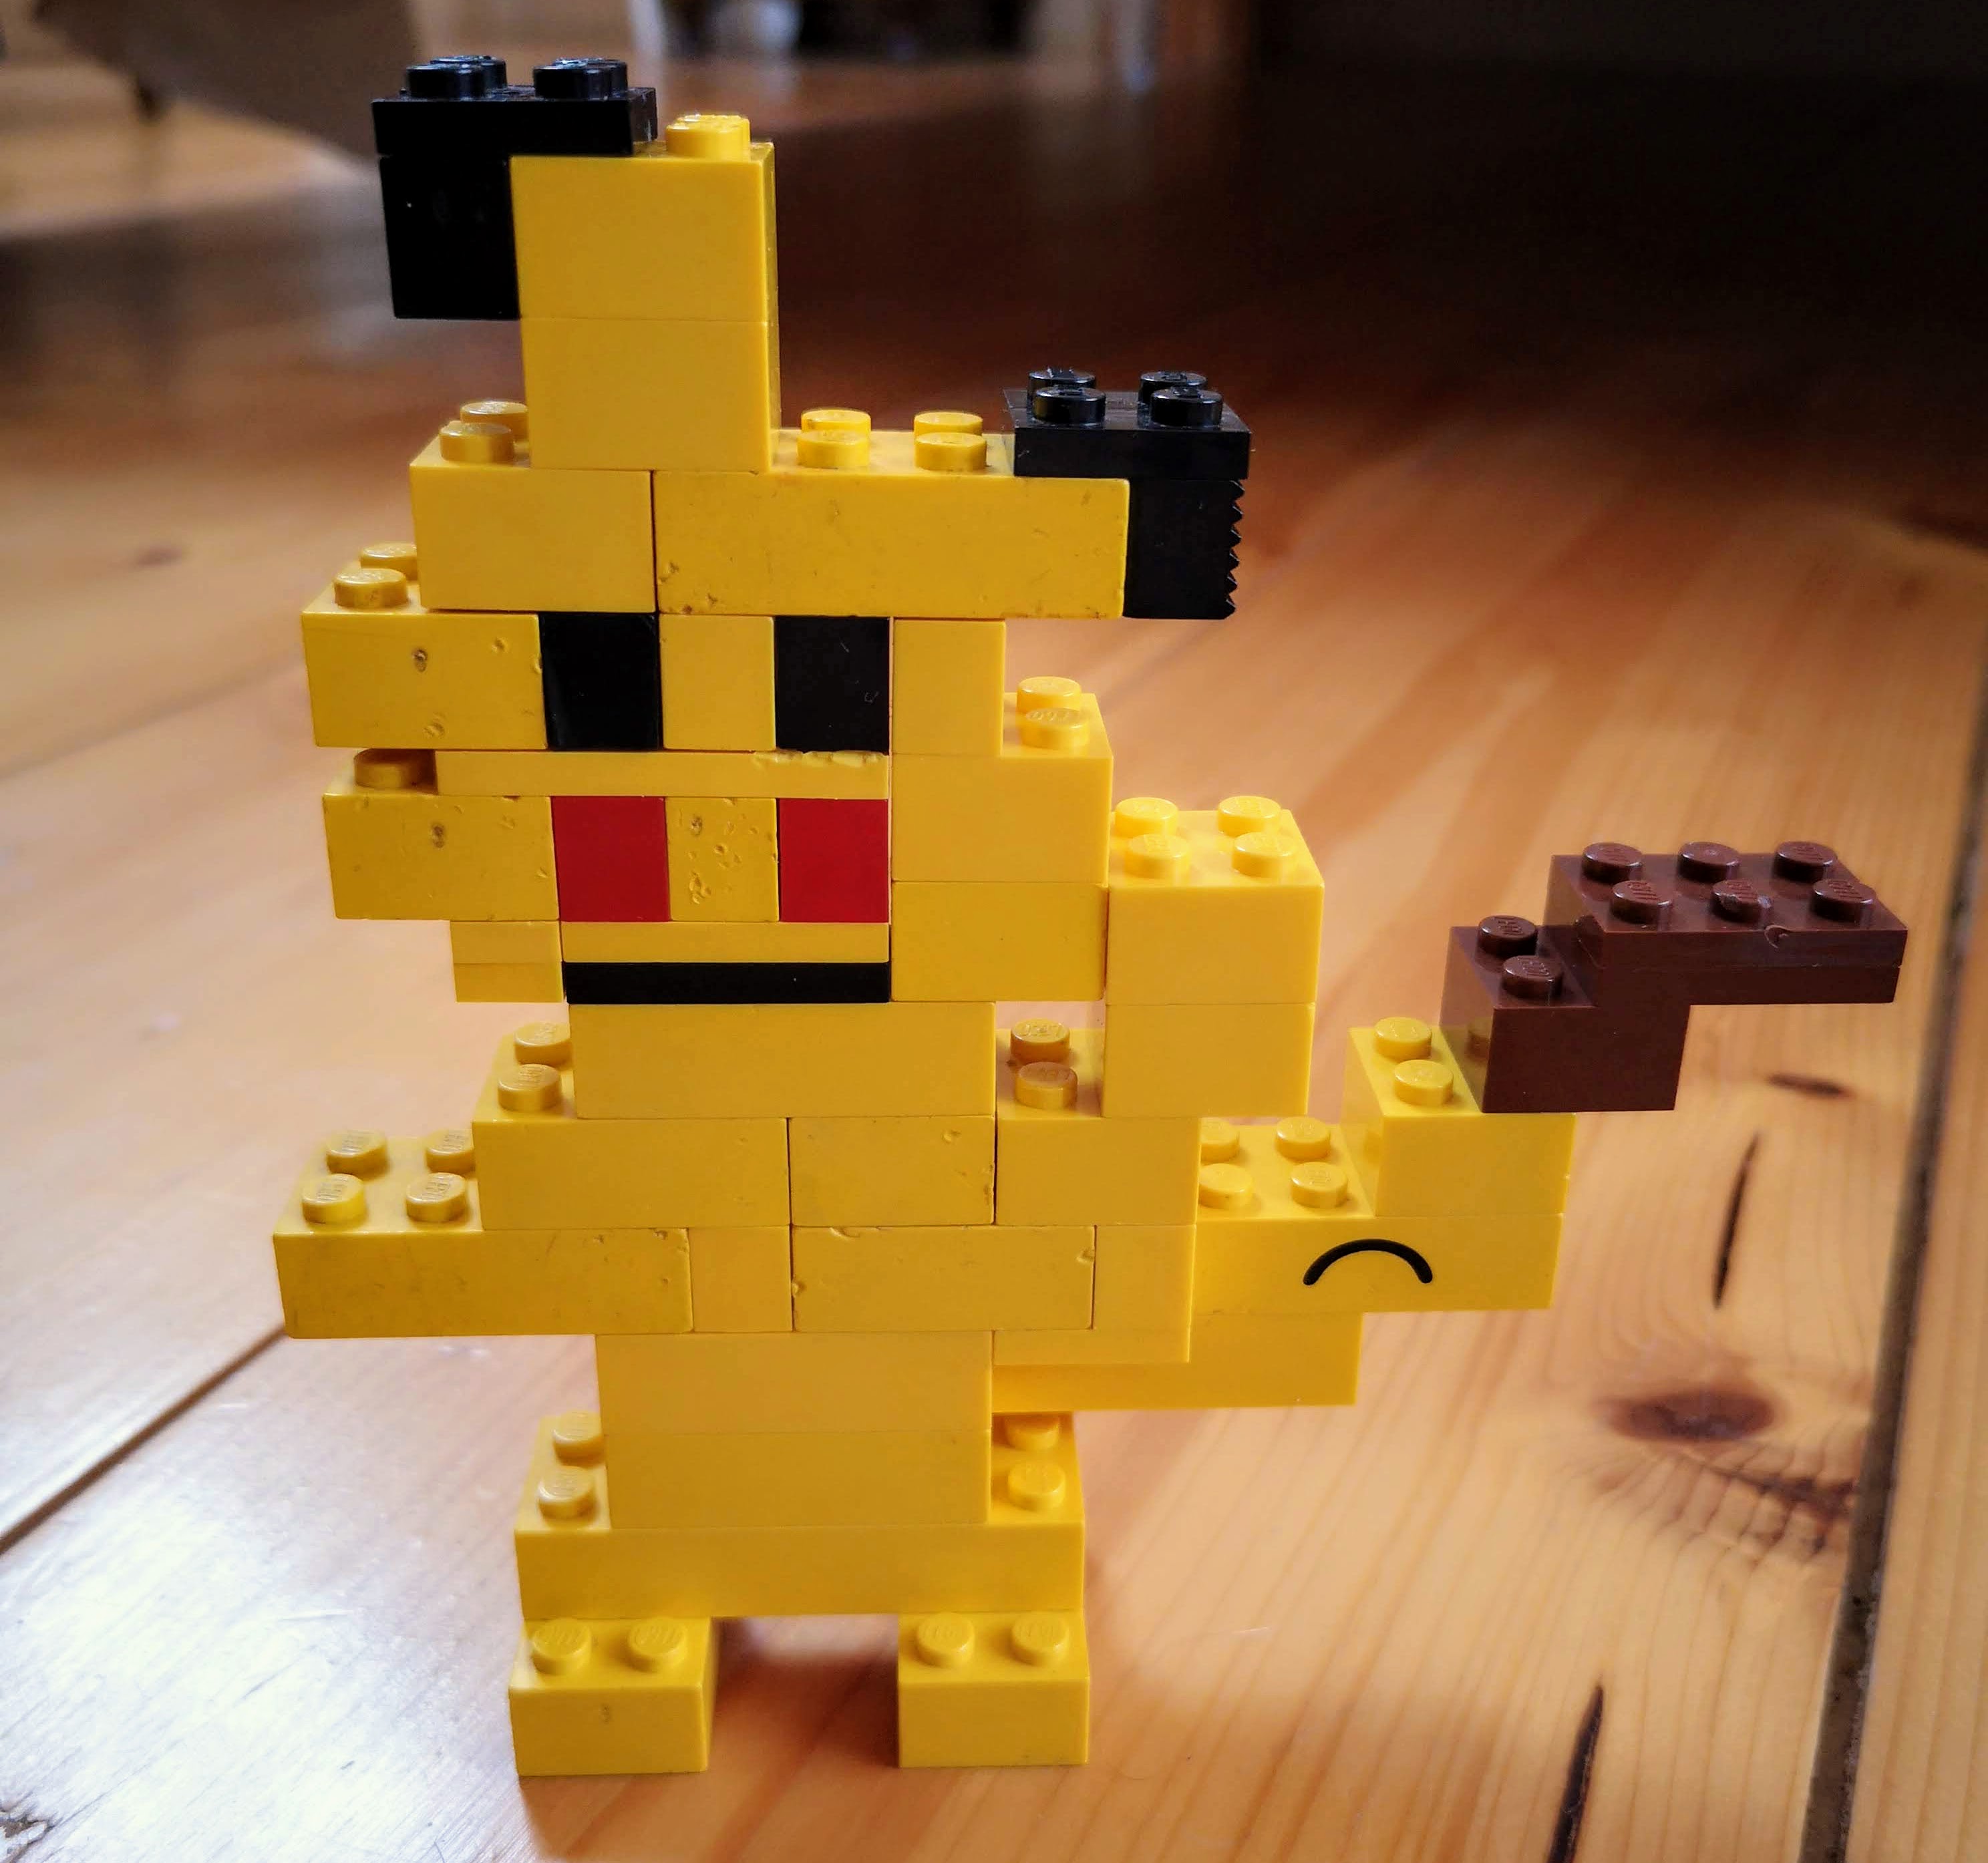
Step 4: Assembling Pikachu’s Body
With the prep work out of the way, it’s time to start building! Begin with Pikachu’s body, as it forms the foundation for the rest of the model. Follow the instructions carefully, paying close attention to the alignment of each piece.
Here’s a quick rundown of the process:
- Start with the base and build upwards.
- Ensure each layer is secure before moving on to the next.
- Double-check your work frequently to avoid mistakes.
Building Pikachu’s body might feel slow at first, but trust me, it’s worth it when you see the results.
Step 5: Adding Pikachu’s Signature Features
Once the body is complete, it’s time to add Pikachu’s iconic features. From the lightning bolt tail to the red cheeks, these details are what make Pikachu truly special. Take your time with each step, as precision is key here.
Here’s a quick guide to adding Pikachu’s features:
- Tail: Attach the lightning bolt tail securely to the back.
- Cheeks: Carefully add the red cheek pieces for that adorable Pikachu look.
- Ears: Attach the ears last to ensure they’re perfectly aligned.
Remember, patience is your best friend here. Rushing through these steps can lead to mistakes, so take your time and enjoy the process.
Pro Tips for Building LEGO Pikachu
Now that you’ve got the basics down, let’s talk about some pro tips to elevate your LEGO Pikachu game. These tricks will help you build faster, more efficiently, and with fewer headaches.
Here are my top tips:
- Use a LEGO removal tool: It’ll save you from breaking pieces or hurting your fingers.
- Work in a well-lit area: Good lighting makes it easier to see small details.
- Take breaks: Building LEGO can be mentally exhausting, so give yourself time to recharge.
- Practice mindfulness: Treat the build as a meditative experience. Focus on the process, not just the end result.
By incorporating these tips into your build, you’ll find the process more enjoyable and rewarding.
Common Issues and How to Fix Them
Even the most experienced builders encounter issues from time to time. Here are some common problems you might face while building LEGO Pikachu and how to solve them:
- Missing pieces: Check the box and contact LEGO customer service if necessary.
- Stuck pieces: Use a removal tool or gently wiggle the piece loose.
- Lost instructions: Download a digital copy from the LEGO website.
Remember, every problem has a solution. Stay calm and methodical, and you’ll overcome any obstacle.
Troubleshooting Your LEGO Build
Finally, let’s talk about troubleshooting. If something doesn’t seem right, don’t panic. Take a deep breath and go back to the basics. Double-check your work, consult the instructions, and don’t hesitate to ask for help if needed.
Here’s a quick troubleshooting checklist:
- Review the instructions for any missed steps.
- Check for misaligned pieces that might cause instability.
- Ensure all pieces are securely attached to avoid wobbling.
With a little patience and persistence, you’ll have your LEGO Pikachu looking picture-perfect in no time.
Conclusion
And there you have it—a comprehensive guide to LEGO Pikachu instructions! Whether you’re a seasoned builder or a total newbie, I hope this guide has given you the confidence and knowledge to tackle this amazing set. Remember, building LEGO is all about creativity, patience, and having fun.
So, what are you waiting for? Grab your LEGO Pikachu set and start building! And don’t forget to share your masterpiece with the world. Whether it’s on social media or with friends and family, showing off your hard work is half the fun.
Thanks for reading, and happy building! If you enjoyed this guide, be sure to check out our other articles for more LEGO tips and tricks. Until next time, keep building and keep dreaming!