Unlocking Remote IoT With Web SSH: The Ultimate Guide To Downloading Ubuntu
Hey there, tech enthusiasts! Ever wondered how you can manage your IoT devices from anywhere in the world using just a web browser? Well, let me tell you something cool – RemoteIoT Web SSH is here to save the day! This powerful tool allows you to connect to your devices securely over the internet, giving you complete control without needing fancy software. If you're looking to set up a robust system, downloading Ubuntu is a great way to start. Let's dive in and explore how this all works!
In this article, we'll break down everything you need to know about RemoteIoT Web SSH, including how it works, why Ubuntu is the perfect choice for your IoT setup, and how to download and configure it like a pro. Whether you're a seasoned developer or just starting out, this guide has got you covered.
So, buckle up and get ready to level up your IoT game. By the end of this, you'll have the knowledge and tools to manage your devices remotely like a boss. Let's get started!
Read also:Unveiling The Secrets Of Mallu 49com Your Ultimate Guide
What is RemoteIoT Web SSH?
RemoteIoT Web SSH is a game-changing technology that allows you to access and control your IoT devices via a web browser. Imagine being able to log into your server, configure settings, and monitor performance without needing any additional software – that's the power of Web SSH. It's especially useful for managing remote servers or devices that don't have a graphical interface.
Here’s why RemoteIoT Web SSH is so awesome:
- Secure connections using SSH protocols
- Easy to use with any modern web browser
- No need for third-party apps or plugins
- Perfect for managing IoT devices from anywhere
Now that you know what RemoteIoT Web SSH is, let's talk about why Ubuntu is the ideal operating system for this setup.
Why Choose Ubuntu for Your IoT Setup?
Ubuntu is one of the most popular Linux distributions out there, and for good reason. It's lightweight, secure, and highly customizable, making it perfect for IoT applications. Plus, it has a massive community of developers and tons of resources available online. If you're serious about setting up a reliable IoT system, Ubuntu should be your go-to choice.
Here are some key benefits of using Ubuntu for IoT:
- Stability and reliability
- Strong security features
- Wide range of supported hardware
- Excellent documentation and community support
Now that we've covered why Ubuntu is such a great option, let's move on to how you can download and install it on your system.
Read also:Movie Rulez Com 2025 The Ultimate Guide To Streaming Movies In The Future
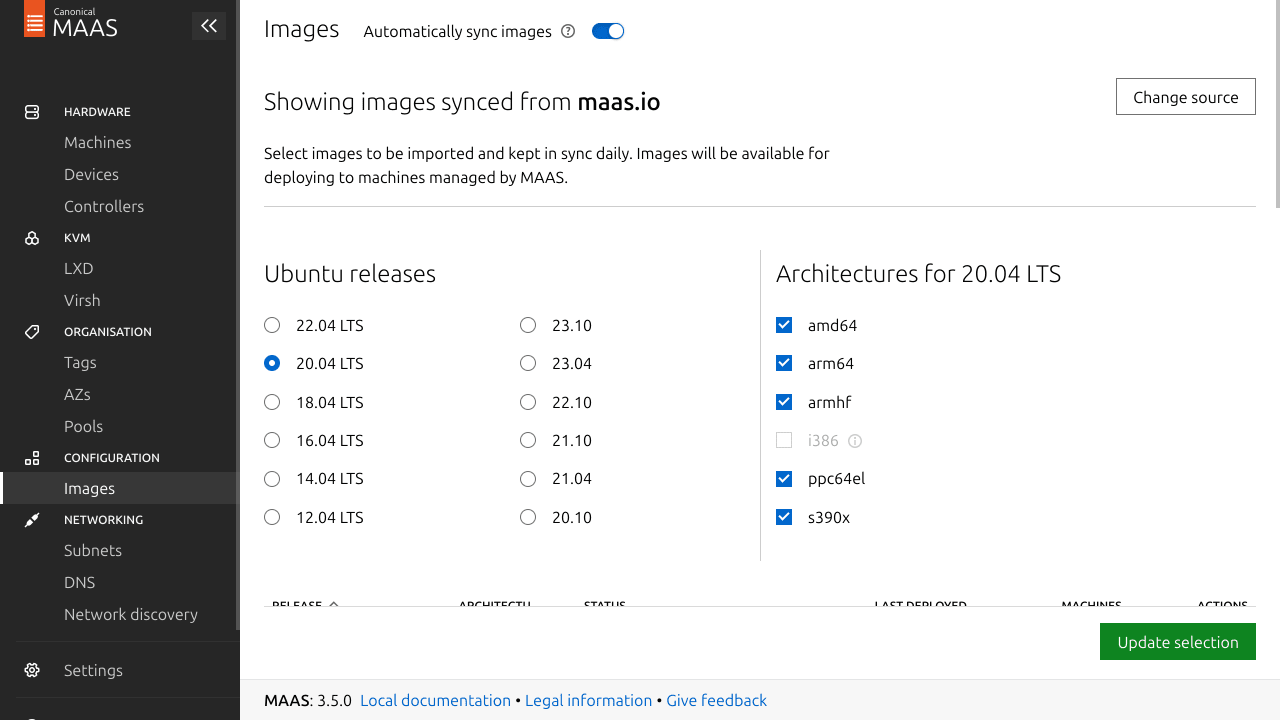
How to Download Ubuntu for Your IoT Project
Downloading Ubuntu is a straightforward process, but there are a few things you need to keep in mind. First, decide which version of Ubuntu you want to use. For IoT projects, the Server edition is usually the best choice because it's lightweight and optimized for headless operations.
Step 1: Visit the Official Ubuntu Website
Head over to the official Ubuntu download page and select the Server version. You'll find options for different architectures, so make sure you pick the one that matches your hardware.
Step 2: Choose Your Flavor
Ubuntu offers several flavors tailored for specific use cases. For IoT, the minimal installation is often the best choice. This version includes only the essential components, keeping the system lean and efficient.
Step 3: Create a Bootable USB Drive
Once you've downloaded the ISO file, you'll need to create a bootable USB drive. Tools like Rufus (for Windows) or Etcher (for macOS and Linux) make this process a breeze. Simply follow the on-screen instructions, and you'll have a bootable drive ready in no time.
Now that you've got your Ubuntu image ready, let's move on to installing it on your device.
Installing Ubuntu on Your IoT Device
Installing Ubuntu on your IoT device is pretty straightforward, but there are a few steps you need to follow carefully to ensure everything goes smoothly.
Step 1: Boot from the USB Drive
Insert the bootable USB drive into your IoT device and restart it. You'll need to enter the BIOS or UEFI settings to change the boot order so that the device boots from the USB drive first.
Step 2: Follow the Installation Wizard
Once the system boots from the USB drive, you'll be greeted by the Ubuntu installer. Follow the on-screen instructions to partition your disk, set up your user account, and configure other settings. If you're not sure about any of the options, the default settings should work just fine for most IoT projects.
Step 3: Complete the Setup
After the installation is complete, reboot your device and remove the USB drive. You should now be able to log in to your new Ubuntu system. Congratulations – you're all set to start configuring your IoT setup!
Now that your system is up and running, let's talk about how to connect to it using RemoteIoT Web SSH.
Connecting to Your IoT Device with RemoteIoT Web SSH
Once Ubuntu is installed on your IoT device, the next step is to set up RemoteIoT Web SSH so you can manage it remotely. Here's how you can do it:
Step 1: Install an SSH Server
Ubuntu comes with OpenSSH pre-installed, but you'll need to enable it first. Open a terminal and run the following command:
sudo apt update && sudo apt install openssh-server
This will install and start the SSH server on your device.
Step 2: Configure Firewall Settings
By default, Ubuntu has a firewall called UFW (Uncomplicated Firewall). You'll need to allow SSH traffic through the firewall to connect remotely. Run the following command to do this:
sudo ufw allow ssh
Step 3: Access Your Device via Web SSH
Now that your SSH server is up and running, you can connect to it using any web-based SSH client. There are several options available, but one of the most popular is AnyConnect Web SSH. Simply enter your device's IP address and credentials, and you'll be connected in no time.
With RemoteIoT Web SSH set up, you can now manage your IoT device from anywhere in the world. Cool, right?
Best Practices for Securing Your IoT Setup
Security is crucial when it comes to IoT devices, especially if you're accessing them remotely. Here are some best practices to keep your system safe:
- Use strong, unique passwords for your SSH accounts
- Enable two-factor authentication (2FA) for added security
- Regularly update your system and install security patches
- Limit SSH access to trusted IP addresses if possible
By following these tips, you can ensure that your IoT setup remains secure and protected against potential threats.
Common Issues and Troubleshooting
Even with the best-laid plans, things can sometimes go wrong. Here are some common issues you might encounter when setting up RemoteIoT Web SSH with Ubuntu, along with solutions to fix them:
Issue 1: Unable to Connect to SSH
If you're having trouble connecting to your SSH server, double-check the following:
- Your device's IP address is correct
- SSH is installed and running on your device
- Firewall rules allow SSH traffic
Issue 2: Slow Connection Speeds
If your SSH connection is slow, try optimizing your network settings or using a faster internet connection. You can also enable compression in SSH to improve performance:
ssh -C username@hostname
Issue 3: Authentication Problems
If you're getting authentication errors, make sure your username and password are correct. If you're using key-based authentication, verify that your SSH keys are properly configured.
Now that we've covered the basics, let's take a look at some advanced features you can explore to enhance your IoT setup.
Advanced Features for Your IoT Setup
Once you've got the basics down, you can start exploring some advanced features to take your IoT setup to the next level. Here are a few ideas:
Feature 1: Automating Tasks with Cron Jobs
Cron is a time-based job scheduler in Linux that allows you to automate tasks like backups, updates, and system maintenance. You can set up cron jobs to run at specific intervals, ensuring that your system stays up to date and running smoothly.
Feature 2: Monitoring System Performance
Use tools like htop or glances to monitor your system's performance in real-time. These tools provide detailed information about CPU usage, memory, disk I/O, and more, helping you identify and resolve performance bottlenecks.
Feature 3: Setting Up a Web Server
If you're planning to host a website or web application on your IoT device, consider setting up a web server like Apache or Nginx. These servers are easy to configure and offer a wide range of features for hosting web content.
With these advanced features, you can create a robust and feature-rich IoT setup that meets all your needs.
Conclusion
Well, there you have it – a comprehensive guide to using RemoteIoT Web SSH with Ubuntu for your IoT projects. From downloading and installing Ubuntu to setting up secure remote connections, we've covered everything you need to get started. Remember, security is key when it comes to IoT, so always follow best practices to keep your system safe.
Now it's your turn to take action! Try setting up your own IoT system using the steps outlined in this article, and don't forget to share your experience in the comments below. If you found this guide helpful, feel free to share it with your friends and fellow tech enthusiasts. Happy tinkering, and see you in the next one!

