Unlocking Remote SSH Access For IoT Devices Behind A Firewall On Ubuntu – For Free!
Are you tired of being locked out of your IoT devices because they’re hiding behind a firewall? Well, buckle up, because we’re about to take you on a journey to unlock the power of remote SSH access for your IoT devices running on Ubuntu – and the best part? It’s completely free! Whether you’re a tech enthusiast, hobbyist, or just someone looking to streamline their home automation setup, this guide is here to help you conquer the challenge.
Let’s face it – IoT devices are everywhere these days. From smart thermostats to security cameras, they’re transforming the way we live and work. But what happens when you want to access those devices remotely but they’re tucked away behind a firewall? That’s where remote SSH comes in – it’s like a secret tunnel that lets you connect to your devices from anywhere in the world. And guess what? You don’t need to break the bank to make it happen.
In this article, we’ll walk you through everything you need to know about setting up remote SSH access for your IoT devices running on Ubuntu. We’ll cover the basics, dive into some advanced techniques, and even throw in a few tips and tricks to keep your setup secure. By the time you’re done reading, you’ll be a pro at navigating firewalls and accessing your IoT devices from anywhere – all without paying a dime.
Read also:5movierulz Telugu 2023 Your Ultimate Guide To Telugu Movie Downloads
So, grab a cup of coffee, sit back, and let’s get started. Whether you’re a beginner or an experienced Linux user, this guide has something for everyone. Let’s make remote SSH access work for you!
Table of Contents
- Introduction to Remote SSH for IoT
- Understanding Firewalls and Why They’re a Challenge
- Setting Up Your IoT Device with Ubuntu
- Configuring SSH on Your IoT Device
- Exploring Port Forwarding for Remote Access
- Using Dynamic DNS for Easy Connectivity
- Security Best Practices for Remote SSH
- Setting Up Reverse SSH Tunneling
- Troubleshooting Common Issues
- Wrapping Up: Your Path to Remote SSH Freedom
Introduction to Remote SSH for IoT
Remote SSH is basically your golden ticket to accessing your IoT devices from anywhere. Think of it as a secure bridge that lets you connect to your devices over the internet. But here’s the catch – most IoT devices are behind firewalls, and that can make things a little tricky. Luckily, with a bit of setup and some clever tricks, you can bypass those firewalls and gain remote access without breaking the bank.
Ubuntu is one of the most popular Linux distributions out there, and it’s a great choice for running on IoT devices. It’s lightweight, secure, and easy to configure. Plus, it comes with built-in support for SSH, which makes setting up remote access a breeze. So, whether you’re running Ubuntu on a Raspberry Pi or any other IoT device, this guide will show you how to get things up and running.
Understanding Firewalls and Why They’re a Challenge
Firewalls are like digital bouncers – they control who gets in and who gets out of your network. While they’re great for keeping unwanted visitors out, they can also block legitimate traffic, like your attempts to connect to your IoT devices remotely. That’s why setting up remote SSH can be a bit of a challenge.
Types of Firewalls
There are different types of firewalls, and each one works a little differently. Here are the main ones you might encounter:
- Software Firewalls: These run on your devices and control incoming and outgoing traffic.
- Hardware Firewalls: These are standalone devices that protect your entire network.
- Cloud Firewalls: These are hosted in the cloud and protect your online services.
Understanding the type of firewall you’re dealing with is key to figuring out how to bypass it. Don’t worry – we’ll cover all the bases in this guide.
Read also:Movie Rulz 2023 Your Ultimate Guide To The Hottest Blockbusters Of The Year
Setting Up Your IoT Device with Ubuntu
Before you can set up remote SSH, you need to make sure your IoT device is running Ubuntu. Here’s a quick rundown of how to get things set up:
Step 1: Install Ubuntu
Start by downloading the latest version of Ubuntu Server from the official website. Then, use a tool like Etcher to flash the image onto an SD card or USB drive. Once that’s done, plug it into your IoT device and boot it up.
Step 2: Update Your System
Once Ubuntu is installed, it’s a good idea to update your system to make sure everything is up to date. You can do this by running the following commands:
sudo apt update && sudo apt upgrade -y
Step 3: Install SSH
SSH comes pre-installed on most Ubuntu systems, but if it’s not already installed, you can install it using the following command:
sudo apt install openssh-server
Configuring SSH on Your IoT Device
Now that you have SSH installed, it’s time to configure it. Here are a few things you’ll want to do:
1. Change the Default Port
Changing the default SSH port (which is 22) can help improve security. To do this, edit the SSH config file:
sudo nano /etc/ssh/sshd_config
Find the line that says "Port 22" and change it to something else, like 2222. Then, restart the SSH service:
sudo systemctl restart ssh
2. Disable Root Login
Disabling root login is another security best practice. To do this, add the following line to your SSH config file:
PermitRootLogin no
3. Use Key-Based Authentication
Instead of using passwords, you can use key-based authentication for added security. Here’s how to set it up:
- Generate a key pair on your local machine using the command: ssh-keygen
- Copy the public key to your IoT device using the command: ssh-copy-id user@your-iot-device
Exploring Port Forwarding for Remote Access
Port forwarding is one way to get around firewalls. It involves forwarding a port on your router to your IoT device. Here’s how to set it up:
Step 1: Log in to Your Router
Open a web browser and enter your router’s IP address. This is usually something like 192.168.1.1. Log in using your router’s credentials.
Step 2: Find the Port Forwarding Section
Look for a section in your router’s settings called "Port Forwarding" or "Virtual Servers." Add a new rule and specify the following:
- External Port: The port you want to use for SSH (e.g., 2222)
- Internal IP Address: The IP address of your IoT device
- Internal Port: The port SSH is running on (e.g., 2222)
Step 3: Test Your Setup
Once you’ve set up port forwarding, test your setup by trying to connect to your IoT device from outside your network. You can do this by using the command:
ssh user@your-public-ip -p 2222
Using Dynamic DNS for Easy Connectivity
If your ISP assigns you a dynamic IP address, you might find it hard to keep track of your public IP. That’s where Dynamic DNS comes in. Services like No-IP or DuckDNS let you assign a domain name to your IP address, so you can connect to your IoT device using a memorable name instead of a bunch of numbers.
How to Set Up Dynamic DNS
Here’s a quick guide to setting up Dynamic DNS:
- Sign up for a free account with a Dynamic DNS provider.
- Create a hostname and associate it with your public IP address.
- Install the Dynamic DNS client on your router or IoT device to keep your hostname updated.
Security Best Practices for Remote SSH
Security should always be a top priority when setting up remote SSH. Here are a few tips to keep your setup secure:
1. Use Strong Passwords
Even if you’re using key-based authentication, it’s a good idea to use strong passwords for your user accounts. Avoid using common words or phrases, and make sure your passwords are at least 12 characters long.
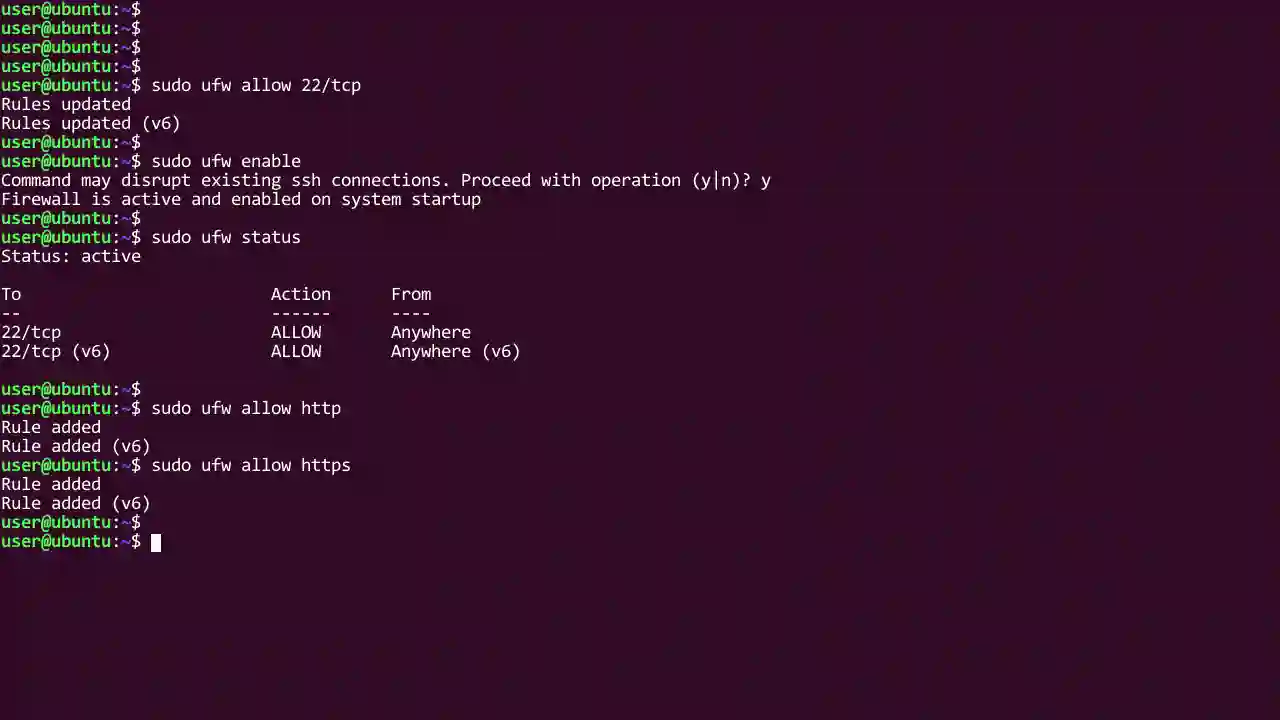
2. Enable Firewall Rules
Use Ubuntu’s built-in firewall (ufw) to restrict access to your SSH port. For example, you can allow only specific IP addresses to connect:
sudo ufw allow from 192.168.1.100 to any port 2222
3. Monitor Your Logs
Keep an eye on your SSH logs to detect any suspicious activity. You can view the logs using the command:
sudo tail -f /var/log/auth.log
Setting Up Reverse SSH Tunneling
Reverse SSH tunneling is another way to bypass firewalls. It involves creating a tunnel from your IoT device to a server that’s accessible from the internet. Here’s how to set it up:
Step 1: Set Up a Remote Server
You’ll need a server that’s accessible from the internet. You can use a cloud-based service like AWS or DigitalOcean to set one up.
Step 2: Create the Tunnel
On your IoT device, run the following command to create the tunnel:
ssh -R 2222:localhost:22 user@your-remote-server
Step 3: Connect to Your IoT Device
To connect to your IoT device, simply connect to your remote server on the specified port:
ssh user@your-remote-server -p 2222
Troubleshooting Common Issues
Even with the best-laid plans, things can sometimes go wrong. Here are a few common issues you might encounter and how to fix them:
1. Can’t Connect to Your IoT Device
Make sure your router’s firewall isn’t blocking the SSH port. Also, double-check your port forwarding settings.
2. Connection Drops Frequently
This could be due to network instability. Try using a wired connection instead of Wi-Fi for your IoT device.
3. Security Warnings
If you’re getting security warnings, it might be because your SSH keys have changed. Delete the old key from your known_hosts file:
ssh-keygen -R your-iot-device
Wrapping Up: Your Path to Remote SSH Freedom
There you have it – a comprehensive guide to setting up remote SSH access for your IoT devices behind a firewall on Ubuntu, completely free of charge. Whether you’re using port forwarding, Dynamic DNS, or reverse SSH tunneling, you now have the tools and knowledge to access your devices from anywhere in the world.
Remember, security should always be a top priority. Follow the best practices we’ve outlined, and you’ll be able to enjoy the convenience of remote access without compromising your device’s security.
So, what are you waiting for? Dive in and start exploring the possibilities. And don’t forget to share your experiences in the comments below. Who knows – you might just inspire someone else to take the leap into the world of remote SSH access!


