Unlocking The Power Of Remote SSH IoT Behind Firewall On Ubuntu: A Comprehensive Guide
Hey there, tech enthusiasts! Are you tired of being stuck behind firewalls when trying to access your IoT devices remotely? Well, guess what? You're not alone. Many people face this challenge, but the good news is, remote SSH IoT behind firewall Ubuntu example is here to save the day. This guide will walk you through the entire process, making it simple and straightforward. So, buckle up and let’s dive right in!
In today’s interconnected world, managing IoT devices remotely is more crucial than ever. Whether you're a developer, hobbyist, or just someone looking to enhance their home automation setup, understanding how to set up remote SSH access is a game-changer. This article will take you step-by-step through the process, ensuring you’re equipped with all the knowledge you need.
We'll cover everything from configuring your Ubuntu server to setting up port forwarding, using reverse SSH tunnels, and even exploring alternative solutions. By the end of this guide, you’ll have the skills to access your IoT devices securely and efficiently, no matter where you are. Ready to get started? Let’s go!
Read also:Viga Movie Your Ultimate Destination For Entertainment
Understanding the Basics of Remote SSH
Before we dive into the nitty-gritty, let’s break down what SSH really is. SSH, or Secure Shell, is a cryptographic protocol that allows you to securely access a remote computer or device over an unsecured network. It's like having a secret handshake that only you and your devices understand. When it comes to remote SSH IoT behind firewall, things can get a little tricky, but don’t worry—we’ve got you covered.
SSH is widely used because it provides encryption for both authentication and data transfer. This means your data is protected from prying eyes, even if it’s traveling across the internet. For IoT enthusiasts, this is a must-have tool, especially when dealing with sensitive data or controlling critical systems remotely.
Why Use SSH for IoT Devices?
Here’s the deal: IoT devices are everywhere, and they’re only going to become more prevalent. From smart thermostats to security cameras, these devices make our lives easier, but they also introduce new challenges. One of the biggest challenges is managing them remotely, especially when they’re behind firewalls or NAT (Network Address Translation) routers.
- SSH provides a secure way to access your devices without exposing them to the public internet.
- It allows you to perform administrative tasks, monitor device health, and even update firmware remotely.
- With SSH, you can automate tasks and scripts, making your IoT setup more efficient and scalable.
Setting Up Your Ubuntu Server
Alright, let’s get practical. The first step in accessing your IoT devices remotely is setting up your Ubuntu server. Ubuntu is one of the most popular Linux distributions, and it’s perfect for this kind of task because of its stability and ease of use. Follow these steps to get your server ready:
Step 1: Install SSH Server
First things first, you need to install the SSH server on your Ubuntu machine. Open up your terminal and type the following command:
sudo apt update && sudo apt install openssh-server
Read also:Kannada Movie Rulz Your Ultimate Guide To The Best Of Karnataka Cinema
This will install the OpenSSH server on your machine. Once the installation is complete, you can check if the service is running by typing:
sudo systemctl status ssh
Step 2: Configure SSH Settings
Now that your SSH server is up and running, it’s time to configure it to suit your needs. Open the SSH configuration file using your favorite text editor:
sudo nano /etc/ssh/sshd_config
Here are some settings you might want to tweak:
- Change the default port (22) to something less common to enhance security.
- Disable root login to prevent unauthorized access.
- Enable key-based authentication for added security.
After making your changes, don’t forget to restart the SSH service:
sudo systemctl restart ssh
Dealing with Firewalls and NAT Routers
Now, here’s where things get interesting. Firewalls and NAT routers can make it difficult to access your IoT devices remotely. But fear not, there are several strategies you can use to overcome these obstacles. Let’s explore them one by one.
Port Forwarding: The Traditional Approach
Port forwarding is a common method for allowing external access to devices behind a firewall. Here’s how it works:
- Log in to your router’s admin interface.
- Find the port forwarding or virtual server settings.
- Add a new rule, specifying the external port, internal IP address, and internal port.
For example, if your Ubuntu server is running on 192.168.1.100 and you’ve changed the SSH port to 2222, you would forward external port 2222 to internal IP 192.168.1.100 on port 2222.
Reverse SSH Tunneling: A Clever Workaround
What if you don’t have access to your router’s settings? That’s where reverse SSH tunneling comes in. This technique allows you to create a secure connection from your IoT device to a publicly accessible server, effectively bypassing the firewall.
Here’s how you can set it up:
- Install SSH on both your IoT device and a public server.
- From your IoT device, run the following command:
ssh -R 2222:localhost:22 user@publicserver.com
This command creates a reverse tunnel, allowing you to access your IoT device via the public server. Pretty cool, right?
Enhancing Security for Remote SSH IoT
Security should always be a top priority, especially when dealing with remote access. Here are some tips to keep your setup secure:
Use Strong Passwords and Keys
Weak passwords are a hacker’s best friend. Make sure you use strong, unique passwords for all your devices. Even better, enable key-based authentication and disable password login altogether.
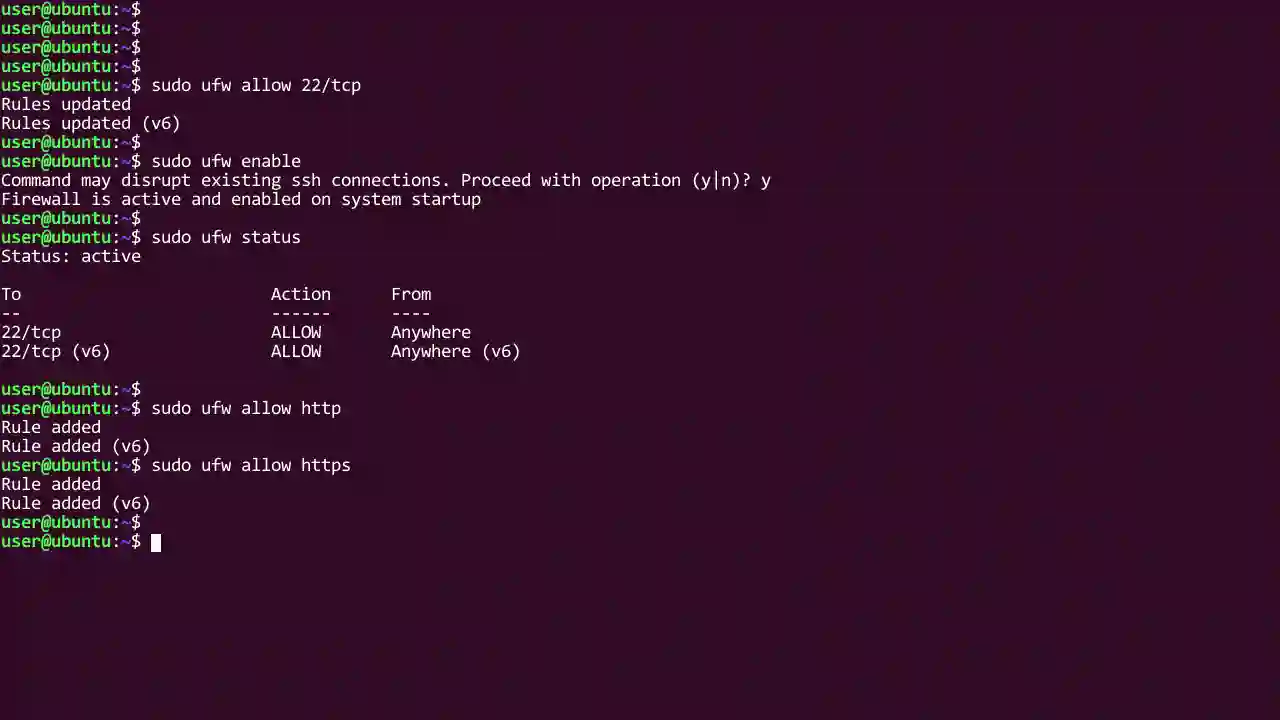
Implement Firewall Rules
Your Ubuntu server likely comes with a firewall pre-installed (UFW). Use it to restrict access to only trusted IP addresses:
sudo ufw allow from 192.168.1.0/24 to any port 2222
This command allows SSH access only from devices on your local network.
Monitor and Log Activity
Keeping an eye on who’s accessing your server is crucial. Regularly check your SSH logs for any suspicious activity:
sudo tail -f /var/log/auth.log
This command displays real-time updates from your authentication log, helping you stay informed.
Exploring Alternative Solutions
While SSH is a powerful tool, it’s not the only way to access your IoT devices remotely. Let’s take a look at some alternatives:
Using Cloud Services
Cloud platforms like AWS IoT Core or Google Cloud IoT Core offer robust solutions for managing IoT devices. They provide features like device authentication, data encryption, and message routing, making them ideal for large-scale deployments.
Tunneling Services
Services like ngrok or PageKite allow you to create secure tunnels to your devices without the need for port forwarding. They’re easy to set up and can be a great option for quick testing or development.
Real-World Example: Setting Up Remote SSH on an IoT Device
Let’s walk through a real-world example to see how all this comes together. Imagine you have a Raspberry Pi running Ubuntu, connected to a temperature sensor. You want to access this device remotely to monitor the sensor data.
Step 1: Install Necessary Software
First, install the SSH server and any other software you need on your Raspberry Pi:
sudo apt update && sudo apt install openssh-server python3
Step 2: Set Up Reverse SSH Tunnel
Next, set up a reverse SSH tunnel to a public server:
ssh -R 2222:localhost:22 user@publicserver.com
Step 3: Access Your Device Remotely
Finally, connect to your Raspberry Pi from anywhere in the world:
ssh -p 2222 user@publicserver.com
Voila! You’re now securely connected to your IoT device, ready to monitor and manage it as needed.
Conclusion: Taking Control of Your IoT Devices
And there you have it—a comprehensive guide to accessing your IoT devices remotely using SSH on Ubuntu. By following the steps outlined in this article, you’ll be able to overcome firewalls, enhance security, and manage your devices with ease. Remember, the key to success is staying informed and keeping your setup secure.
Now it’s your turn! Try out these techniques and see how they work for you. If you have any questions or run into issues, feel free to drop a comment below. And don’t forget to share this article with your fellow tech enthusiasts. Together, we can unlock the full potential of IoT and remote access. Happy tinkering!
Table of Contents
- Understanding the Basics of Remote SSH
- Setting Up Your Ubuntu Server
- Dealing with Firewalls and NAT Routers
- Enhancing Security for Remote SSH IoT
- Exploring Alternative Solutions
- Real-World Example: Setting Up Remote SSH on an IoT Device
- Conclusion: Taking Control of Your IoT Devices


