Mastering RemoteIoT SSH AWS Example: A Beginner's Guide To Secure Connections
Welcome to the world of remote IoT! If you're diving into the realm of IoT (Internet of Things) and AWS (Amazon Web Services), then understanding how to set up secure connections through SSH (Secure Shell) is crucial. RemoteIoT SSH AWS example isn't just about connecting devices; it's about securing them too. In this article, we’ll explore everything you need to know to get started, from setting up SSH keys to managing IoT devices on AWS. Let's jump right in!
Picture this: you're managing a network of IoT devices scattered across different locations. You need a way to connect to these devices securely without compromising their data. That's where SSH comes in. SSH is like a secret handshake that allows you to communicate with your devices over the internet without worrying about snoopers. AWS adds another layer of security and scalability, making it the perfect platform for managing IoT setups.
Now, before we dive deep into the RemoteIoT SSH AWS example, let’s clarify something. This isn’t just about setting up a connection; it’s about doing it right. From creating secure keys to configuring firewalls, every step matters. Whether you're a developer, a hobbyist, or someone looking to expand their IoT knowledge, this guide will walk you through the entire process. Let's get started!
Read also:Dealing With Sce Power Outage Your Ultimate Guide To Staying Prepared
Understanding the Basics of RemoteIoT SSH AWS
What is SSH and Why is it Important?
SSH, or Secure Shell, is like the invisible shield that protects your data when you're accessing remote devices. It encrypts all communication between your local machine and the remote device, ensuring that no one can intercept your sensitive information. When it comes to IoT, where devices are often spread out in different locations, SSH is a must-have tool.
Here’s why SSH is so important:
- It encrypts all data transfers, keeping your information safe from prying eyes.
- It provides authentication, ensuring that only authorized users can access your devices.
- It supports key-based authentication, which is more secure than traditional passwords.
So, whether you're managing a smart home or a network of industrial sensors, SSH ensures that your IoT devices remain secure.
Why Choose AWS for Your IoT Projects?
AWS is more than just a cloud platform; it's a powerhouse for IoT projects. With AWS IoT Core, you can connect millions of devices and process trillions of messages. Plus, AWS provides robust security features, making it the go-to platform for managing IoT setups.
Here’s what AWS brings to the table:
- Scalability: AWS can handle as many devices as you need, no matter how big your network grows.
- Security: AWS offers a range of security features, including encryption, key management, and identity management.
- Integration: AWS integrates seamlessly with other services, allowing you to build complex IoT solutions easily.
In short, AWS makes it easy to manage and secure your IoT devices, which is why it's the perfect platform for RemoteIoT SSH AWS example setups.
Read also:Unpacking The Timeless Philosophy Of Calvin And Hobbes
Setting Up SSH on AWS for IoT Devices
Creating SSH Keys for Secure Connections
Before you can start connecting to your IoT devices via SSH, you need to create SSH keys. These keys act as your digital ID, allowing you to access your devices securely. Here's how you can create SSH keys on AWS:
- Log in to your AWS Management Console.
- Go to the EC2 Dashboard and click on "Key Pairs."
- Click on "Create Key Pair" and give it a name, like "IoT-Key."
- Download the private key file (.pem) and store it in a secure location.
That's it! You now have a set of SSH keys that you can use to connect to your IoT devices securely. Remember, the private key is like your digital passport; keep it safe!
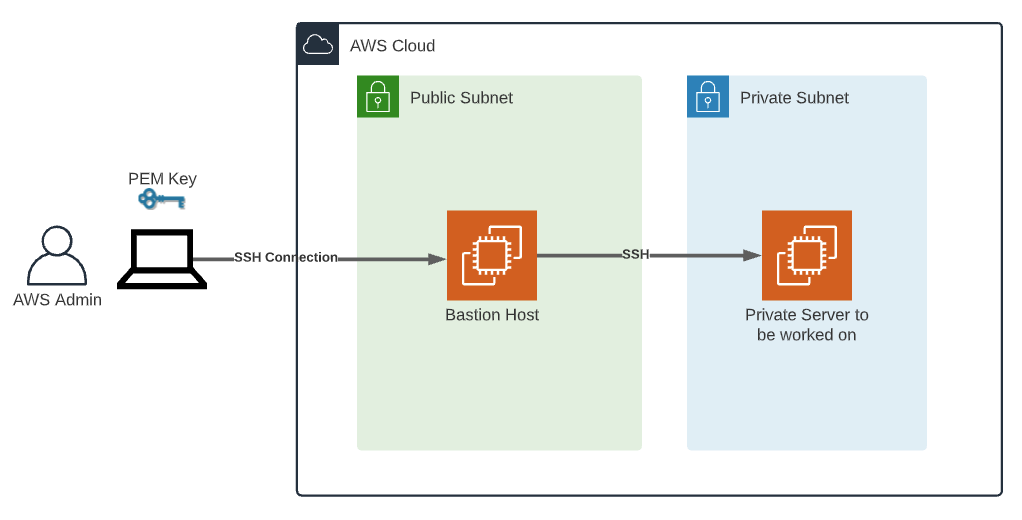
Configuring Security Groups for SSH Access
Once you've created your SSH keys, the next step is to configure security groups. Security groups act as virtual firewalls, controlling access to your instances. Here's how you can configure them:
- Go to the EC2 Dashboard and click on "Security Groups."
- Click on "Create Security Group" and give it a name, like "IoT-SSH."
- In the inbound rules section, add a rule for SSH (port 22) and specify the IP address that will be allowed to connect.
- Save the security group and attach it to your IoT instance.
With your security groups set up, you can now control who can access your IoT devices via SSH. This is a crucial step in ensuring the security of your network.
Connecting to IoT Devices via SSH
Using SSH to Connect to Your IoT Instance
Now that you've created SSH keys and configured security groups, it's time to connect to your IoT device. Here's how you can do it:
- Open a terminal or command prompt on your local machine.
- Use the following command to connect to your IoT instance:
ssh -i /path/to/your-key.pem ec2-user@your-instance-public-ip. - Enter "yes" when prompted to confirm the authenticity of the host.
- You should now be connected to your IoT instance.
That’s it! You’re now securely connected to your IoT device via SSH. From here, you can manage your device, update its software, or troubleshoot any issues.
Managing IoT Devices with SSH
Once you're connected to your IoT device, you can start managing it. Whether you need to update software, check logs, or configure settings, SSH gives you full control. Here are a few common tasks you can perform:
- Updating Software: Use commands like
sudo apt updateandsudo apt upgradeto keep your device's software up to date. - Checking Logs: Use
tail -f /var/log/syslogto monitor your device's logs in real-time. - Configuring Settings: Edit configuration files using a text editor like nano or vi.
With SSH, you have the power to manage your IoT devices from anywhere in the world, as long as you have an internet connection.
Best Practices for Secure IoT Connections
Using Key-Based Authentication
One of the best ways to secure your IoT devices is by using key-based authentication instead of passwords. Here's why:
- Keys are harder to guess or brute-force than passwords.
- Keys can be revoked easily if they're compromised.
- Keys can be configured with additional security features, like passphrase protection.
To enable key-based authentication, follow these steps:
- Generate a new SSH key pair using the
ssh-keygencommand. - Add the public key to the
~/.ssh/authorized_keysfile on your IoT device. - Disable password authentication by editing the
/etc/ssh/sshd_configfile and settingPasswordAuthentication no. - Restart the SSH service using
sudo service ssh restart.
With key-based authentication, you can rest assured that your IoT devices are secure from unauthorized access.
Regularly Updating SSH
Like any software, SSH is not immune to vulnerabilities. To ensure your connections remain secure, it's important to keep SSH updated. Here's how you can do it:
- Log in to your IoT device via SSH.
- Run the following commands to update SSH:
sudo apt updatesudo apt install openssh-server
- Restart the SSH service using
sudo service ssh restart.
By keeping SSH updated, you protect your IoT devices from potential security threats.
Real-World RemoteIoT SSH AWS Example
Case Study: Managing a Network of Smart Sensors
Let’s look at a real-world example of how RemoteIoT SSH AWS can be used. Imagine you're managing a network of smart sensors deployed across a large industrial facility. These sensors collect data on temperature, humidity, and air quality, which is then sent to AWS for processing and analysis.
Here’s how you can use SSH and AWS to manage this network:
- Connect to Sensors: Use SSH to connect to each sensor and monitor its status.
- Update Firmware: Push firmware updates to the sensors using SSH scripts.
- Monitor Data: Use AWS IoT Core to collect and analyze the data sent by the sensors.
This setup ensures that your sensors remain secure and that the data they collect is processed efficiently.
Troubleshooting Common Issues
Even with the best setup, things can go wrong. Here are some common issues you might encounter and how to fix them:
- Connection Refused: Check your security group settings to ensure that SSH is allowed.
- Permission Denied: Make sure your SSH key has the correct permissions (use
chmod 400 your-key.pem). - Timeout Errors: Verify that your instance is running and that its public IP address is correct.
By troubleshooting these issues, you can keep your IoT network running smoothly.
Advanced Topics in RemoteIoT SSH AWS
Using SSH Tunnels for Secure Data Transfer
SSH tunnels are a powerful tool for securely transferring data between your local machine and your IoT devices. Here's how you can set one up:
- Use the following command to create an SSH tunnel:
ssh -L local_port:destination_host:destination_port -i /path/to/your-key.pem ec2-user@your-instance-public-ip. - Once the tunnel is established, you can access the destination host as if it were on your local network.
SSH tunnels are especially useful when you need to transfer sensitive data or access services that aren't publicly accessible.
Automating SSH Connections with Scripts
Managing multiple IoT devices can be time-consuming. To streamline the process, you can use scripts to automate your SSH connections. Here's an example:
- Create a script that loops through a list of IoT devices and connects to each one using SSH.
- Use the script to perform routine tasks, like updating software or checking logs.
With automation, you can save time and reduce the risk of human error.
Conclusion
We’ve covered a lot of ground in this article, from understanding the basics of RemoteIoT SSH AWS example to setting up secure connections and managing IoT devices. Whether you're a beginner or an experienced developer, the principles we’ve discussed will help you build a secure and scalable IoT network.
Here’s a quick recap of what we’ve learned:
- SSH is essential for securing IoT device connections.
- AWS provides a powerful platform for managing IoT setups.
- Creating SSH keys and configuring security groups are crucial steps in securing your network.
- Best practices like key-based authentication and regular updates are key to maintaining security.
Now it’s your turn! Take what you’ve learned and start building your own IoT network. And don’t forget to share your experiences in the comments below. Happy coding!
Table of Contents
- Understanding the Basics of RemoteIoT SSH AWS
- Setting Up SSH on AWS for IoT Devices
- Connecting to IoT Devices via SSH
- Best Practices for Secure IoT Connections
- Real-World RemoteIoT SSH AWS Example
- Advanced Topics in RemoteIoT SSH AWS
- Conclusion


 and AWS (Amazon Web Services), then understanding how to set up )