Mastering The Management Of Raspberry Pi Remotely: A Comprehensive Guide
Hey there, tech enthusiasts! If you're reading this, chances are you're diving deep into the world of Raspberry Pi or maybe you're already knee-deep in projects but struggling with managing your tiny powerhouse remotely. Don’t worry, you’re not alone. The management of Raspberry Pi remotely has become a hot topic in the tech world, and for good reason. Whether you're a seasoned pro or a newbie, this guide is here to help you master remote management like a boss.
Now, let me paint you a picture. Imagine being able to control your Raspberry Pi from anywhere in the world, whether you're at home, at work, or even on vacation. Sounds cool, right? Remote management isn’t just about convenience; it’s about unlocking the full potential of your Raspberry Pi without being physically present. And trust me, once you get the hang of it, you’ll wonder how you ever lived without it.
In this article, we’ll explore everything you need to know about managing your Raspberry Pi remotely. From setting up the basics to troubleshooting common issues, we’ve got you covered. So grab your favorite drink, sit back, and let’s dive into the fascinating world of remote Raspberry Pi management. It’s going to be a wild ride!
Read also:Unveiling The Magic Your Ultimate Guide To Walnut Creek Movie Theatre
Here’s a quick roadmap of what we’ll cover in this article:
- Getting Started with Remote Management
- Essential Tools and Software
- Network Configuration for Remote Access
- Setting Up SSH for Secure Connections
- Using VNC for Remote Desktop Access
- Managing Files Remotely
- Security Tips for Remote Management
- Automating Remote Tasks
- Troubleshooting Common Issues
- Wrapping It Up
Getting Started with Remote Management
Alright, let’s kick things off by understanding the basics. Remote management of Raspberry Pi involves controlling your device from another computer or device without being physically present. Sounds simple enough, but there are a few things you need to set up first.
Before you dive into the nitty-gritty, make sure your Raspberry Pi is up and running. You’ll also need a stable internet connection and a device to manage it from. Whether you’re using a laptop, smartphone, or even another Raspberry Pi, as long as it’s connected to the internet, you’re good to go.
Why Remote Management Matters
Remote management isn’t just about convenience. It’s about efficiency, flexibility, and scalability. Imagine running a server or hosting a website on your Raspberry Pi. Being able to manage it remotely means you can troubleshoot issues, update software, and monitor performance without being tied to a specific location.
Plus, let’s face it, life happens. What if you’re out of town and need to reboot your Raspberry Pi? With remote management, you can do it from the comfort of your hotel room or even on the go.
Essential Tools and Software
Now that you understand the basics, it’s time to talk about the tools and software you’ll need to manage your Raspberry Pi remotely. There are several options available, each with its own set of features and benefits.
Read also:10 Musttry Things To Do This Weekend Thatrsquoll Blow Your Mind
SSH: The Backbone of Remote Management
SSH, or Secure Shell, is one of the most popular tools for remote management. It allows you to connect to your Raspberry Pi securely and execute commands as if you were sitting right in front of it. To use SSH, you’ll need to enable it on your Raspberry Pi and install an SSH client on your managing device.
Some popular SSH clients include:
- Putty (Windows)
- Terminal (Mac/Linux)
- MobileSSH (iOS/Android)
VNC: For When You Need a GUI
While SSH is great for command-line tasks, sometimes you need a graphical interface. That’s where VNC (Virtual Network Computing) comes in. VNC allows you to access the desktop of your Raspberry Pi remotely, giving you full control over its graphical environment.
To set up VNC, you’ll need to install a VNC server on your Raspberry Pi and a VNC client on your managing device. Some popular VNC clients include:
- TightVNC
- RealVNC
- AnyDesk
Network Configuration for Remote Access
One of the most critical aspects of remote management is network configuration. Your Raspberry Pi needs to be accessible over the internet, which requires some setup on your network.
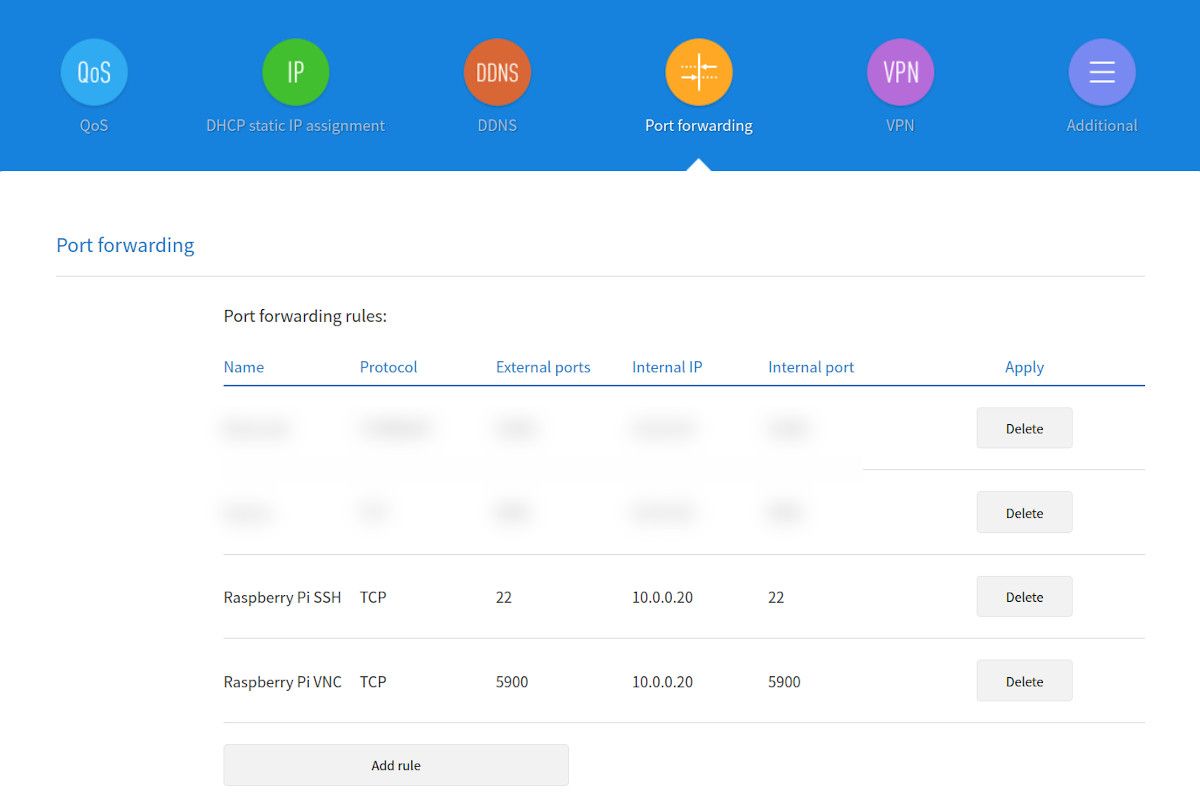
Setting Up Port Forwarding
Port forwarding is the process of directing incoming traffic from the internet to your Raspberry Pi. This allows you to connect to your device from anywhere in the world. To set up port forwarding, you’ll need to access your router’s settings and configure the necessary ports.
For SSH, you’ll typically forward port 22. For VNC, you might need to forward ports 5900-590X, depending on the number of VNC sessions you plan to run.
Dynamic DNS: Solving the IP Address Puzzle
Most home internet connections use dynamic IP addresses, which can change periodically. This can make it difficult to connect to your Raspberry Pi remotely. That’s where Dynamic DNS (DDNS) comes in. DDNS services update your domain name with your current IP address, ensuring you can always connect.
Some popular DDNS providers include:
- No-IP
- DuckDNS
- Cloudflare
Setting Up SSH for Secure Connections
SSH is the backbone of remote management, so it’s essential to set it up correctly. Here’s a step-by-step guide to help you get started.
Enabling SSH on Raspberry Pi
To enable SSH on your Raspberry Pi, follow these steps:
- Open the Raspberry Pi Configuration tool by typing
sudo raspi-configin the terminal. - Select
Interfacing Options. - Select
SSHand enable it. - Reboot your Raspberry Pi to apply the changes.
Connecting via SSH
Once SSH is enabled, you can connect to your Raspberry Pi using an SSH client. Simply enter the IP address of your Raspberry Pi and your login credentials, and you’re good to go.
For added security, consider using SSH keys instead of passwords. This not only enhances security but also eliminates the need to enter a password every time you connect.
Using VNC for Remote Desktop Access
While SSH is great for command-line tasks, sometimes you need a graphical interface. That’s where VNC comes in. Here’s how to set it up.
Installing VNC Server
To install VNC server on your Raspberry Pi, follow these steps:
- Open the terminal and type
sudo apt updateto update your package list. - Type
sudo apt install realvnc-vnc-server realvnc-vnc-viewerto install VNC server. - Enable VNC by typing
sudo raspi-config, selectingInterfacing Options, and enabling VNC.
Connecting via VNC
Once VNC is installed and enabled, you can connect to your Raspberry Pi using a VNC client. Simply enter the IP address of your Raspberry Pi and your login credentials, and you’ll have full access to its graphical interface.
Managing Files Remotely
Managing files remotely is an essential part of Raspberry Pi management. Whether you’re transferring files to or from your Raspberry Pi, there are several tools and methods you can use.
Using SCP for Secure File Transfer
SCP, or Secure Copy, is a command-line tool for transferring files securely over SSH. To use SCP, you’ll need to know the IP address of your Raspberry Pi and the location of the files you want to transfer.
For example, to transfer a file from your local machine to your Raspberry Pi, you can use the following command:
scp /path/to/local/file pi@raspberrypi:/path/to/remote/directoryUsing SFTP for Interactive File Transfer
SFTP, or Secure File Transfer Protocol, is another option for transferring files securely. Unlike SCP, SFTP provides an interactive shell, allowing you to browse directories and perform file operations.
To use SFTP, simply type sftp pi@raspberrypi in the terminal and follow the prompts.
Security Tips for Remote Management
Security is a top priority when it comes to remote management. Here are some tips to help you keep your Raspberry Pi safe.
Change the Default SSH Port
Changing the default SSH port from 22 to something less common can help reduce the risk of automated attacks. To do this, edit the SSH configuration file:
sudo nano /etc/ssh/sshd_configChange the Port line to your desired port number and restart the SSH service:
sudo service ssh restartUse Strong Passwords or SSH Keys
Using strong passwords or SSH keys can significantly enhance the security of your Raspberry Pi. Avoid using easily guessable passwords and consider using a password manager to generate and store complex passwords.
Automating Remote Tasks
Automation is the key to efficient remote management. By automating repetitive tasks, you can save time and reduce the risk of errors.
Using Cron for Scheduled Tasks
Cron is a time-based job scheduler in Unix-like operating systems. You can use it to schedule tasks such as backups, updates, and maintenance scripts.
To edit the cron table, type crontab -e in the terminal and add your scheduled tasks. For example, to run a backup script every day at midnight, you can add the following line:
0 0 * * * /path/to/backup/scriptUsing Ansible for Configuration Management
Ansible is a powerful tool for automating configuration management and deployment. With Ansible, you can manage multiple Raspberry Pi devices from a single control node, making it ideal for large-scale deployments.
Troubleshooting Common Issues
Even with the best setup, things can go wrong. Here are some common issues you might encounter and how to fix them.
Connection Refused Errors
If you’re getting a "connection refused" error, it could mean that SSH or VNC isn’t running, or there’s a network issue. Check that the service is running and that your network configuration is correct.
Slow Connection Speeds
Slow connection speeds can be frustrating, especially when managing large files or running resource-intensive applications. Consider upgrading your internet connection or using a wired connection instead of Wi-Fi.
Wrapping It Up
And there you have it, folks! A comprehensive guide to mastering the management of Raspberry Pi remotely. From setting up SSH and VNC to automating tasks and ensuring security, we’ve covered everything you need to know to take your Raspberry Pi management to the next level.
Remember, remote management isn’t just about convenience; it’s about unlocking the full potential of your Raspberry Pi. So go ahead, experiment, and see what you can achieve. And don’t forget to share your experiences and tips in the comments below. Who knows, you might just inspire someone else to take the leap into remote management.
Until next time, keep coding, keep creating, and keep exploring the endless possibilities of the Raspberry Pi world!
