Securely Connect Remote IoT VPC: A Raspberry Pi AWS Example
Imagine this: You're sitting in your cozy living room, sipping coffee, while your IoT devices on the other side of the world are working like magic. But how do you ensure they're secure? That's where securely connecting remote IoT VPC using Raspberry Pi and AWS comes into play. This setup is not just about tech wizardry; it’s about creating a fortress for your data.
Nowadays, everyone’s talking about IoT, and rightly so. These smart devices are revolutionizing the way we live and work. But with great power comes great responsibility, right? If you're diving into the world of IoT, you need to know how to protect your devices from cyber threats. And that’s exactly what we’re here to discuss today.
This guide is your ultimate companion for securely connecting remote IoT VPC using Raspberry Pi and AWS. Whether you're a tech enthusiast or a professional looking to enhance your skills, this article will walk you through every step of the process. Let’s get started!
Read also:Socal Edison Planned Outages The Inside Scoop You Need To Know
Table of Contents:
- Introduction to IoT Security
- Raspberry Pi and AWS Setup
- Understanding VPC Architecture
- Securing IoT Devices
- Establishing a Remote Connection
- Best Practices for IoT Security
- Troubleshooting Common Issues
- Real-World Example
- Cost Considerations
- Conclusion
Introduction to IoT Security
Let’s be real, IoT security is no joke. As more and more devices get connected to the internet, the risk of cyberattacks increases exponentially. Think about it—your smart fridge, thermostat, and even your security cameras could become entry points for hackers. That’s why setting up a secure VPC (Virtual Private Cloud) is crucial.
In this section, we’ll explore why IoT security matters and how it impacts businesses and individuals alike. We’ll also touch on the basics of VPC and why it’s the go-to solution for securing IoT devices.
So, what exactly is a VPC? Simply put, it’s a virtual network dedicated to your AWS account. It allows you to launch resources in a logically isolated section of the AWS cloud, giving you complete control over who gets access. And when you combine this with Raspberry Pi, the possibilities are endless.
Why IoT Security Matters
Here’s the deal: IoT devices are vulnerable. They’re often designed with convenience in mind, sometimes at the expense of security. That’s why you need to take extra precautions to protect your data and devices.
- Protect sensitive information from unauthorized access.
- Prevent malicious attacks that could disrupt your operations.
- Ensure compliance with industry regulations and standards.
Raspberry Pi and AWS Setup
Alright, let’s talk about the stars of our show—Raspberry Pi and AWS. These two are like peanut butter and jelly; they just go together. But before you can securely connect your IoT devices, you need to set them up properly.
Read also:Superman Quest For Peace Cast Ndash The Unsung Heroes Behind The Iconic Story
First things first, you’ll need a Raspberry Pi. It doesn’t matter which model you choose, as long as it’s compatible with AWS. Once you have your Pi, it’s time to configure it. This involves setting up the operating system, installing necessary software, and configuring network settings.
Next up is AWS. You’ll need to create an account if you don’t already have one. Once you’re logged in, you can start setting up your VPC. This includes creating subnets, security groups, and route tables. Don’t worry if this sounds overwhelming—we’ll break it down step by step.
Setting Up Raspberry Pi
Here’s a quick rundown of what you need to do:
- Download and install the Raspberry Pi OS.
- Connect your Pi to the internet.
- Install AWS CLI (Command Line Interface) on your Pi.
- Configure your Pi to connect to your AWS VPC.
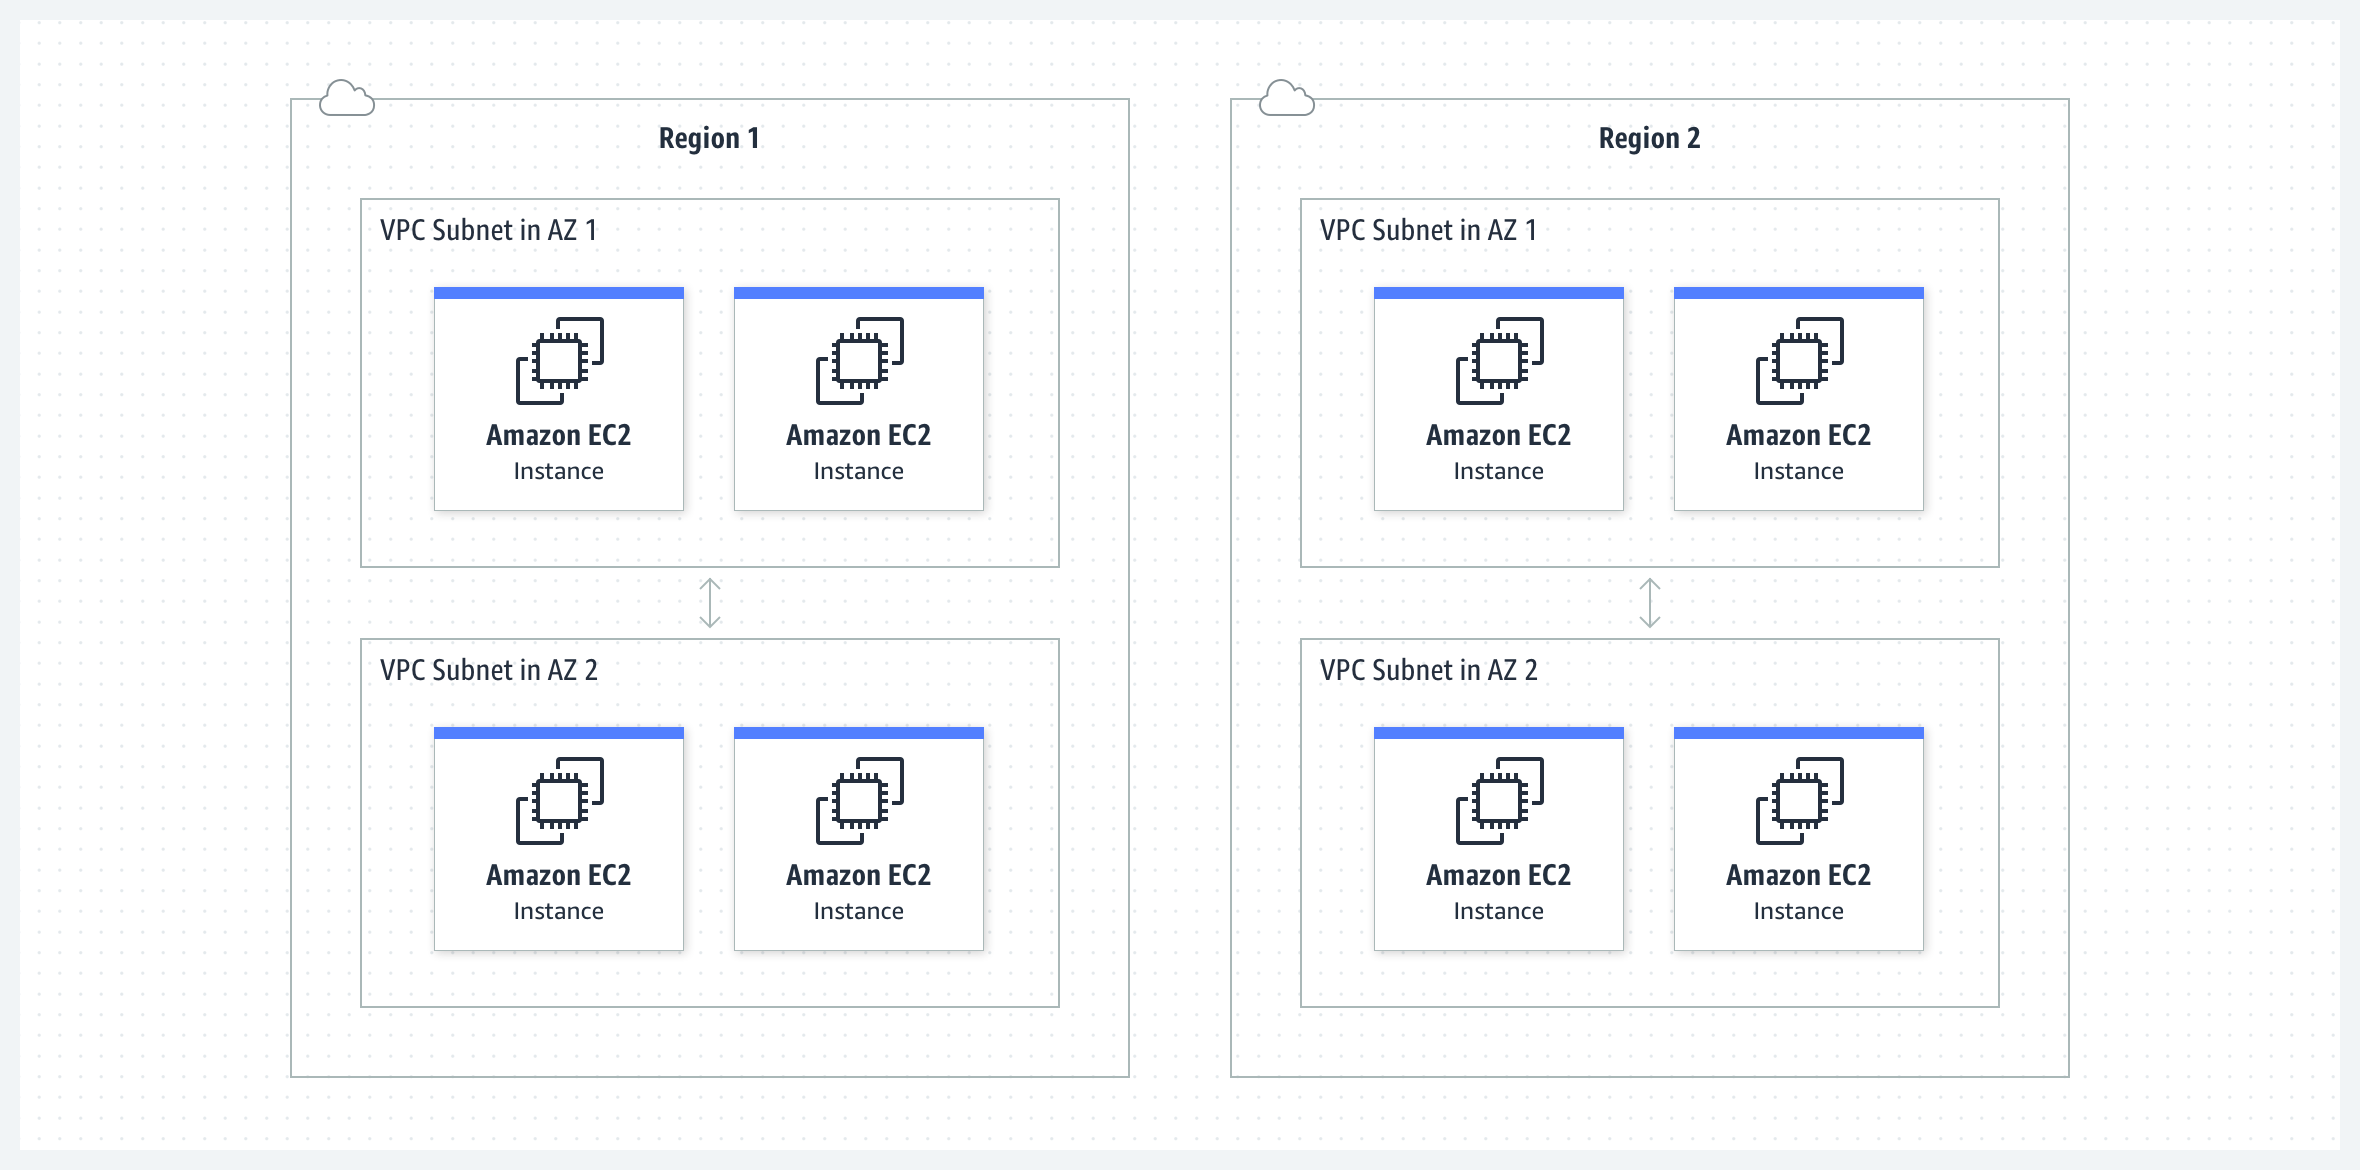
Understanding VPC Architecture
Now that you’ve got your Raspberry Pi and AWS set up, it’s time to dive into VPC architecture. Understanding how VPC works is essential for creating a secure environment for your IoT devices.
A VPC consists of several components, including subnets, security groups, and route tables. Subnets divide your VPC into smaller networks, allowing you to control traffic flow. Security groups act as virtual firewalls, controlling inbound and outbound traffic. And route tables determine how traffic is routed within your VPC.
Here’s a tip: Always use private subnets for your IoT devices. This ensures that they’re not directly accessible from the internet, reducing the risk of unauthorized access.
Key Components of VPC
- Subnets: Divide your VPC into smaller networks.
- Security Groups: Control inbound and outbound traffic.
- Route Tables: Determine how traffic is routed within your VPC.
Securing IoT Devices
Securing your IoT devices is where the rubber meets the road. You’ve got your VPC set up, but that’s just the beginning. There are several steps you can take to further enhance the security of your devices.
First, make sure your devices are running the latest firmware. Manufacturers often release updates to fix security vulnerabilities, so it’s important to keep your devices up to date. Second, use strong passwords and two-factor authentication whenever possible.
Lastly, consider using encryption to protect your data. This ensures that even if someone intercepts your data, they won’t be able to read it without the decryption key.
Best Security Practices
- Keep your devices updated with the latest firmware.
- Use strong passwords and two-factor authentication.
- Encrypt your data to protect it from unauthorized access.
Establishing a Remote Connection
Now that everything is set up and secured, it’s time to establish a remote connection. This is where the magic happens. By connecting your Raspberry Pi to your AWS VPC, you can control your IoT devices from anywhere in the world.
There are several ways to establish a remote connection. You can use SSH (Secure Shell) to connect to your Pi, or you can set up a VPN (Virtual Private Network) for added security. Both methods have their pros and cons, so it’s up to you to decide which one works best for your needs.
SSH vs. VPN
- SSH: Easy to set up, but less secure than a VPN.
- VPN: More secure, but can be more complex to configure.
Best Practices for IoT Security
Security is an ongoing process, not a one-time event. To keep your IoT devices secure, you need to follow best practices and stay vigilant. Here are a few tips to help you along the way:
- Regularly monitor your devices for unusual activity.
- Limit access to your devices to only those who need it.
- Use network segmentation to isolate your IoT devices.
Remember, security is all about layers. The more layers you have, the harder it is for attackers to penetrate your defenses.
Troubleshooting Common Issues
Even the best-laid plans can go awry sometimes. If you’re having trouble with your setup, don’t panic. Here are a few common issues and how to fix them:
- Can’t connect to your Pi? Check your network settings and make sure your Pi is connected to the internet.
- Getting permission errors? Double-check your security groups and make sure they’re configured correctly.
- Data not syncing? Verify that your encryption keys are correct and that your devices are communicating properly.
Real-World Example
Let’s bring it all together with a real-world example. Imagine you’re running a small business with IoT devices scattered across multiple locations. By using Raspberry Pi and AWS, you can securely connect all of these devices to a centralized VPC.
This setup allows you to monitor and manage your devices from a single dashboard. You can set up alerts for unusual activity, schedule firmware updates, and even automate tasks. The possibilities are endless!
Cost Considerations
Of course, no discussion about IoT would be complete without talking about costs. While Raspberry Pi and AWS are relatively affordable, there are still costs to consider. These include the cost of the Pi itself, AWS service fees, and any additional hardware or software you may need.
That said, the benefits of securely connecting your IoT devices far outweigh the costs. Think of it as an investment in the security and longevity of your devices.
Conclusion
And there you have it—your comprehensive guide to securely connecting remote IoT VPC using Raspberry Pi and AWS. By following the steps outlined in this article, you can create a secure environment for your IoT devices and protect them from cyber threats.
So, what’s next? Take action! Start by setting up your Raspberry Pi and AWS account. Then, configure your VPC and secure your IoT devices. Remember, security is a journey, not a destination. Stay vigilant and keep learning.
Got any questions or comments? Drop them below, and let’s keep the conversation going. And if you found this article helpful, don’t forget to share it with your friends and colleagues. Happy securing!


