How To Remove EBay Listing: A Comprehensive Guide
Have you ever wondered how to remove eBay listing without feeling like you're stuck in a maze? Let’s face it, selling on eBay can be super rewarding, but sometimes things don’t go as planned. Whether you accidentally listed the wrong item, want to stop a sale, or just need to cancel a listing, knowing how to remove eBay listing is crucial. In this guide, we’ll walk you through every step, from the basics to advanced tips, so you can manage your eBay listings like a pro.
Now, before we dive deep into the nitty-gritty, let’s talk about why this matters. Imagine you’ve listed an item, but later realize it’s already sold offline or you’ve made a pricing mistake. Instead of panicking, you can take control by removing the listing. This isn’t just about avoiding awkward situations; it’s about maintaining your reputation as a seller. Trust me, nobody likes dealing with buyers who are confused or upset.
So, whether you’re a seasoned eBay seller or just starting out, this guide is for you. We’ll cover everything from canceling active listings to understanding the policies that might affect your account. Ready? Let’s get into it!
Read also:Did Thomas Matthew Crooks Have A Funeral Unveiling The Mystery Around His Final Goodbye
Why Would You Want to Remove eBay Listing?
Let’s start with the basics. Why would someone want to remove eBay listing in the first place? Well, there are plenty of reasons, and most of them are legit. Here’s a quick rundown:
- You listed the wrong item by mistake.
- The item is no longer available because it was sold offline.
- You made a pricing error and don’t want to sell at a loss.
- You want to re-list the item with better photos or descriptions.
- You’re not ready to ship the item due to unforeseen circumstances.
These are just a few examples, but the bottom line is simple: removing a listing is your right as a seller. However, eBay has some rules you need to follow, and we’ll break those down later in this article.
Understanding eBay Policies for Removing Listings
Before you hit that "cancel" button, it’s important to understand eBay’s policies. Sure, you can remove a listing, but there are certain conditions you need to meet. For instance, if someone has already placed a bid or bought your item, canceling the listing might not be as straightforward.
eBay wants to protect both buyers and sellers, so they’ve set up some guidelines. Here’s what you need to know:
- You can only cancel a listing if no bids have been placed or if the item hasn’t been sold.
- If someone has bid on your item, you’ll need to contact them and explain the situation before canceling.
- In some cases, eBay might allow you to cancel a sold listing, but this depends on the circumstances.
Keep in mind that violating these policies can lead to account penalties, so always play by the rules. Trust me, nobody wants to deal with a suspended account!
Step-by-Step Guide: How to Remove eBay Listing
Now that you know the why and the rules, let’s get into the how. Removing a listing on eBay is pretty straightforward if you follow these steps:
Read also:Cardinals Baseball Schedule Your Ultimate Guide To The 2023 Season
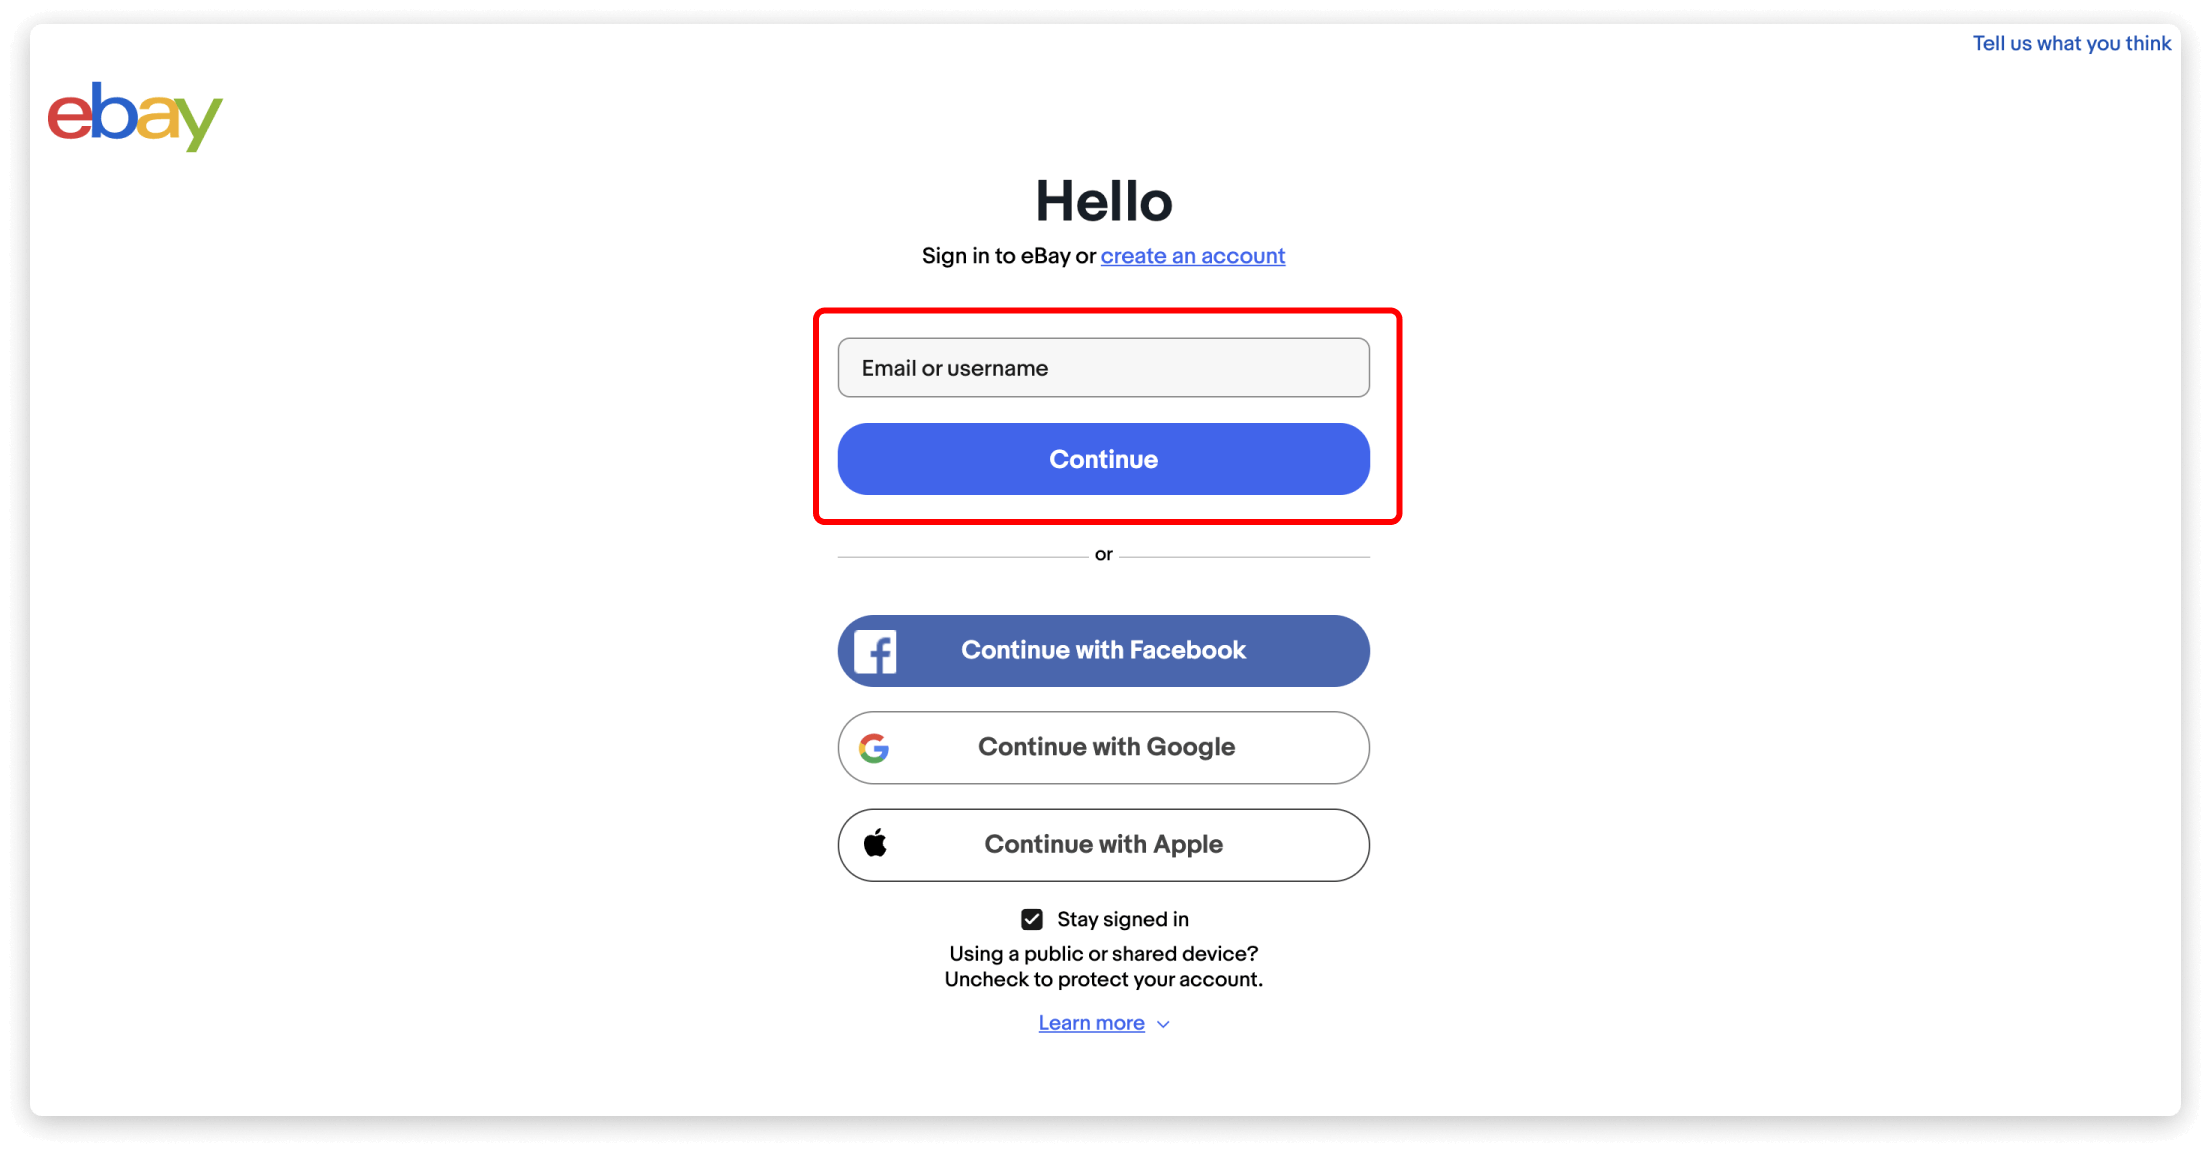
1. Log in to Your eBay Account
First things first, you need to log in to your eBay account. Make sure you’re using the correct email and password. If you’ve forgotten your login details, you can reset them by clicking the "Forgot Password" link.
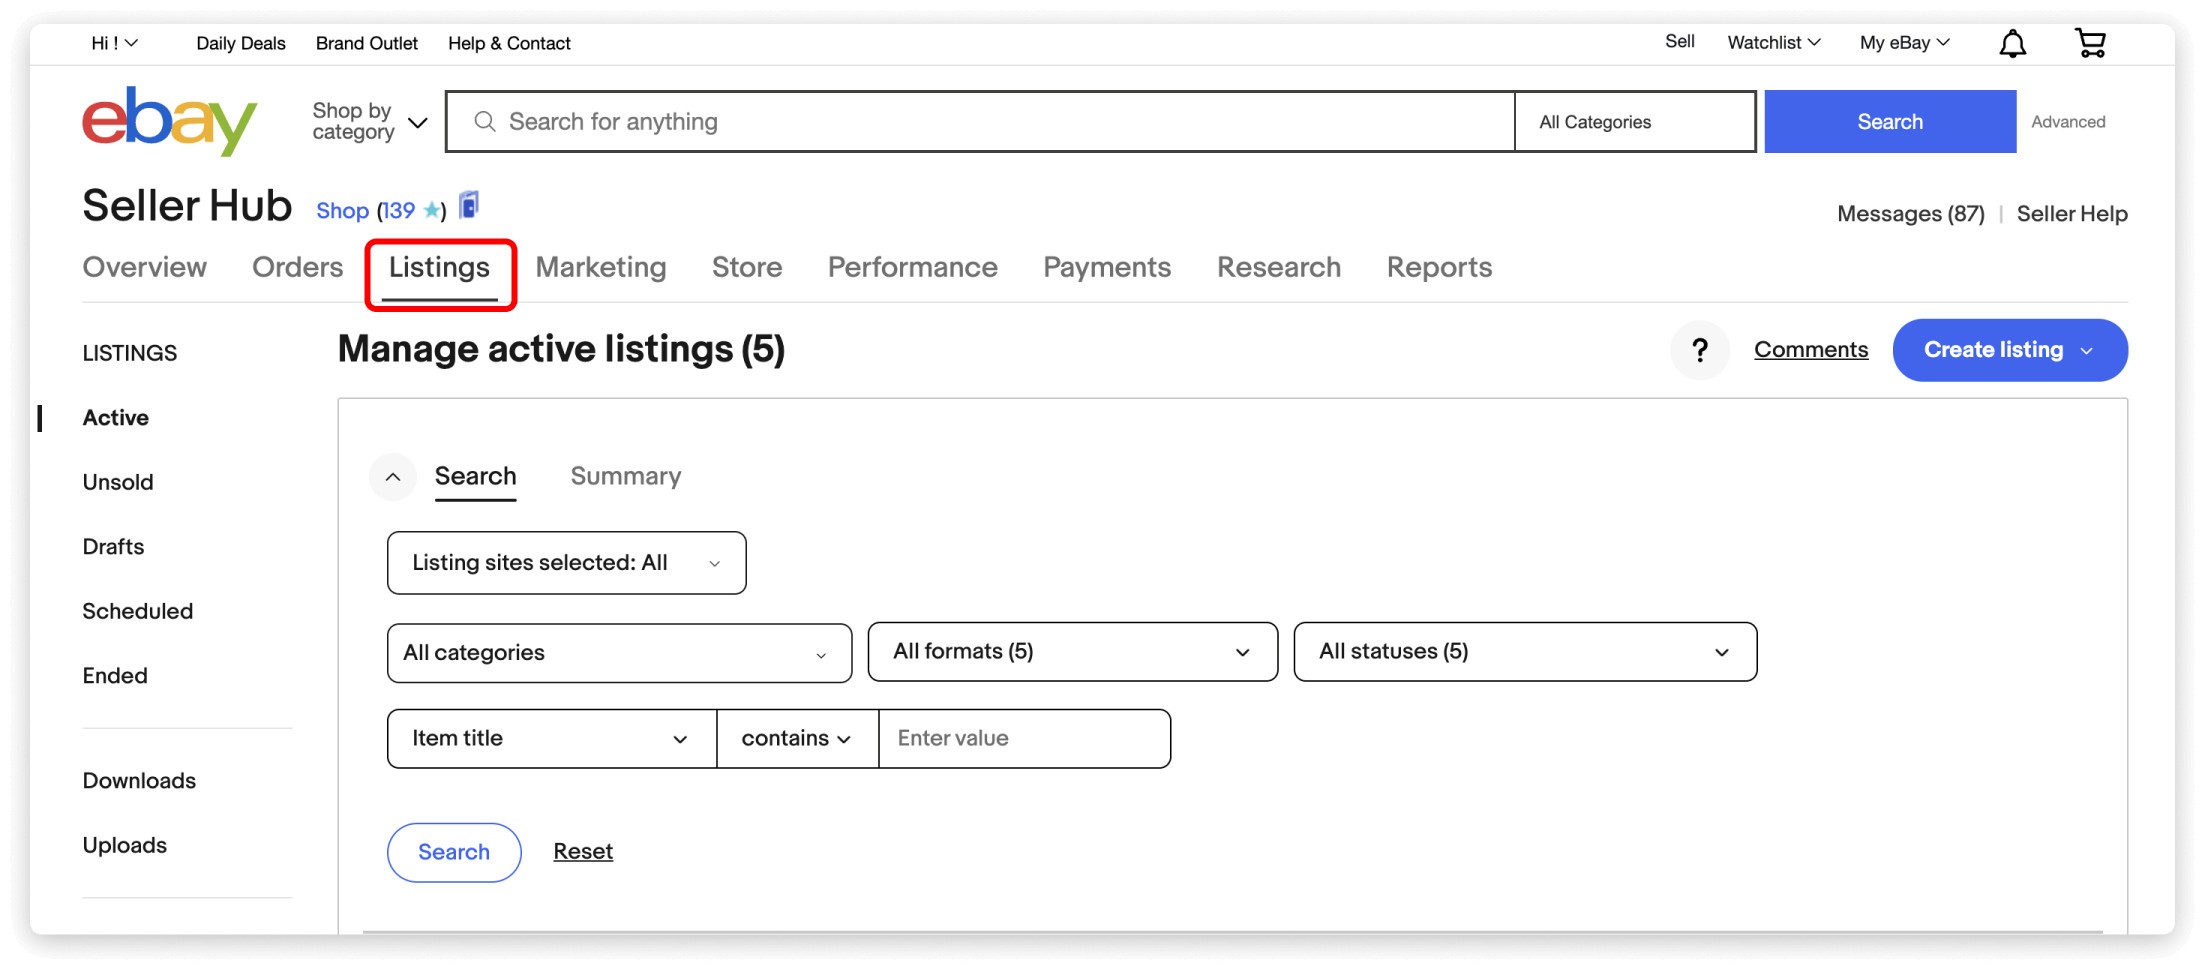
2. Navigate to Your Seller Hub
Once you’re logged in, head over to the Seller Hub. This is where all your active listings, sales, and account settings are managed. You can find the Seller Hub by clicking on the "Sell" tab at the top of the page.
3. Locate the Listing You Want to Remove
In the Seller Hub, you’ll see a list of all your active listings. Use the search bar to find the specific listing you want to remove. If you have a lot of listings, you can filter them by date, category, or status.
4. Click on "End Listing"
Once you’ve found the listing, click on the "End Listing" button. This will bring up a confirmation screen where you’ll need to select a reason for ending the listing. Be honest and choose the option that best fits your situation.
5. Confirm the Removal
After selecting a reason, click on "End Listing Now" to confirm the removal. That’s it! Your listing will be removed from eBay, and you won’t have to worry about it anymore.
Pro Tip: If you plan to re-list the item, save the listing details before ending it. This way, you won’t have to start from scratch when you’re ready to list it again.
What Happens After You Remove a Listing?
Once you’ve removed a listing, what happens next? Well, it depends on whether the item was sold or not. If the item wasn’t sold, the listing will simply disappear from eBay, and you won’t owe any fees. However, if the item was sold, things get a little more complicated.
If someone has already purchased your item, canceling the listing might result in a fee. eBay charges a final value fee for sold items, even if you cancel the sale. To avoid this, try to resolve the issue with the buyer before canceling the listing.
Also, keep in mind that removing a listing too often can affect your seller performance. eBay tracks things like listing cancellations, returns, and customer complaints to determine your account status. So, use this feature wisely!
Common Mistakes to Avoid When Removing Listings
While removing a listing might seem simple, there are a few common mistakes that sellers make. Here’s what to watch out for:
- Not checking for bids: Always double-check to make sure no one has placed a bid before canceling a listing.
- Ignoring buyer communication: If someone has already purchased your item, failing to communicate with them can lead to negative feedback.
- Removing listings too frequently: As mentioned earlier, removing listings too often can hurt your seller performance. Try to re-list items only when necessary.
By avoiding these mistakes, you can ensure a smooth process and maintain a positive reputation on eBay.
Tips for Managing Your Listings Effectively
Now that you know how to remove eBay listing, let’s talk about how to manage your listings effectively. Here are a few tips to help you stay organized and avoid future issues:
- Use eBay’s listing tools: eBay offers a variety of tools to help you manage your listings, including scheduling, bulk editing, and analytics.
- Keep detailed records: Maintain a spreadsheet or document with all your listing details. This will make it easier to re-list items if needed.
- Monitor your seller performance: Regularly check your seller dashboard to see how you’re doing. Address any issues promptly to avoid account penalties.
These tips might seem small, but they can make a big difference in your overall success as an eBay seller.
Advanced Techniques for Removing Listings in Bulk
If you’re a power seller with hundreds of listings, removing them one by one can be a nightmare. Luckily, eBay offers a bulk editing feature that lets you remove multiple listings at once. Here’s how it works:
1. Go to Your Seller Hub
Just like before, start by navigating to your Seller Hub. This is where all your active listings are managed.
2. Select Listings for Removal
Use the checkboxes next to the listings you want to remove. You can select individual listings or use the "Select All" option to choose multiple listings at once.
3. Click on "End Listings"
Once you’ve selected the listings, click on the "End Listings" button. You’ll be prompted to confirm the removal and select a reason for ending the listings.
4. Confirm the Removal
After selecting a reason, click on "End Listings Now" to confirm the removal. Your selected listings will be removed from eBay instantly.
This feature is a lifesaver for sellers who need to manage large volumes of listings. Just remember to double-check your selections before confirming!
Understanding the Risks of Removing Listings
While removing listings can be a helpful tool, it’s not without risks. Here are a few things to consider:
- Final value fees: If you cancel a sold item, you might still owe a final value fee. Make sure you understand the fee structure before canceling.
- Buyer dissatisfaction: Canceling a listing after someone has purchased the item can lead to negative feedback or disputes. Always communicate with buyers before canceling.
- Account penalties: Removing listings too frequently or violating eBay’s policies can result in account penalties, including listing restrictions or account suspension.
By understanding these risks, you can make informed decisions and avoid potential pitfalls.
Conclusion: Mastering the Art of Removing eBay Listings
In conclusion, knowing how to remove eBay listing is an essential skill for any seller. Whether you’re canceling a single listing or managing hundreds, following the steps outlined in this guide will help you do it efficiently and effectively.
Remember, the key to success on eBay is maintaining a positive reputation. Always communicate with buyers, follow eBay’s policies, and use the tools available to manage your listings. By doing so, you’ll not only avoid common mistakes but also improve your overall performance as a seller.
So, what are you waiting for? Go ahead and try it out! And don’t forget to leave a comment or share this article if you found it helpful. Happy selling!
Daftar Isi
- Why Would You Want to Remove eBay Listing?
- Understanding eBay Policies for Removing Listings
- Step-by-Step Guide: How to Remove eBay Listing
- What Happens After You Remove a Listing?
- Common Mistakes to Avoid When Removing Listings
- Tips for Managing Your Listings Effectively
- Advanced Techniques for Removing Listings in Bulk
- Understanding the Risks of Removing Listings
- Biography (if applicable)
- Conclusion: Mastering the Art of Removing eBay Listings

